Category Archives: Recipes

Talking Turkey and October’s Food Challenge

No, this is not my overstuffed pantry, but a girl can dream…

Source: houzz.com via Vinobaby on Pinterest

I know I am massively late for posting the results of my October Food Challenge. You remember: The Official USDA Food Plan: cost of food at four different levels 2011 U.S. average said I should be spending between $488 (Thrifty plan) and $964.20 (Liberal plan) per month for my family of two adults (19-50 years) and one child (6-8 years). If you don’t remember, click here for a refresher.

The first half of the month I spent $172.41. Which included Kiddo’s birthday festivities.

And for the second half of October I spent….

{drum roll please}
$185.41

Which is very high for us, but I had a Costco trip and hosted a steak dinner for a friend’s 50th Birthday.

For a Grand Total of  $357.82 or $82.63 per week

We ate one meal out. Kiddo & Hubby brown-bagged it each day.

That’s $130.18 UNDER the USDA’s $488 Thrifty Meal Plan.

Ooookkkaay…so this doesn’t include wine, but it’s everything else. And my cupboards and freezers are still stuffed. Although nowhere near as pretty as one shown above, but eat well for well under budget.

********************

But now it’s time to talk turkey.

Thanksgiving duties alternate between my parents and my In-Laws usually.  I host Christmas dinner each year. Some years I’ve made dressed-up pork, I’ve cooked lasagna Bolognese, and I’ve done turkey. I try to mix it up each year, do something special, something memorable.

Last year we decided to smoke a turkey on our gas grill. We brined it overnight, then slowly smoked it (far from the house) over mesquite and hickory chips. It was a giant experiment, my Dad (the smoker), my Hubby (the griller), and myself (the head chef) all working together to figure it out.

It was the best damn turkey I have ever eaten.

So of course, I plan on doing it again this year. Except, for some reason, I didn’t write down exactly how we did it.

Crap.

I remember watching some YouTube videos and checking out a zillion recipes online, but for some bizarre reason I didn’t bookmark the one(s) we used. Or maybe I accidentally deleted it? Ah, I must find that recipe!


30 minutes later…
Oh wait…THIS one looks familiar. It’s Alton Brown’s Honey Brined Smoked Turkey. I’m pretty sure this is it. I know I would have trusted Alton and it looks familiar. Hallelujah!

Wait, now that I have watched the video I KNOW this is the recipe. I must not have saved it because I would have just assumed I would trust Alton Brown with this kind of experiment.


Courtesy of he Food Network

If you want something different, something juicy and smokey and succulent and flat-out divine try it.  It may take a little more effort than popping a Butterball in the oven (in the bag!) but the brining keeps it moist and plump, and the smoking…well, THAT you can taste for yourself.

I will never make turkey another way again. Thanks Alton.

Flippant Foodie Friday: Crepes {part un}

Have you checked out Bookshelf Bombshells yet?  If not, got there…now.

I have a fabulous review of Cooking For Geeks: Real Science,Great Hacks, and Good Food by Jeff Potter up on the site. Check it out. It will prove that I am a real writer and occasionally intelligent, as well.  The holidays (there are more of them than just Christmas, folks — get over it) are rapidly approaching, and I always have some guys in my life that are just impossible to shop for.  You know who I’m talking about: your techie brother who rarely looks up from a screen, the dear friend who decided to make Napalm in his backyard at age twelve just to see if he could (and still thinks dangerous things are cool) — this book is perfect for them, and perhaps you too. Read the review and see for yourself.

I  pick one recipe to “officially” review per selection, and I simply had to experiment with Jeff Potter’s formula for crepes.  I have had a secret love affair with crepes since I first discovered them at a French Club banquet in high school, but they can be tricky and time consuming to make. This recipe worked. The directions were clear and easy to follow. And they made sense.

I doubled the ingredients and ended up with 12 thin and pliant crepes. My taste testers swooned over them at dinner (with an Apricot-Dijon Chicken filling — I’ll feature THAT recipe next week). And for dessert, Nutella and banana crepes with a chocolate drizzle. {drool} Try it. Your friends and family will thank you.

1-2-3 Crepes

Whisk or puree until entirely mixed, about 30 seconds:
1 cup (250g) milk (preferably whole milk)
2 large (120g) eggs
1/3 cup (40g) flour (all-purpose)
Pinch of salt

Let rest for at least 30 minutes, preferably longer, so that the gluten in the flour has a chance to thicken the batter. (Stash the batter in the fridge if you’re going to leave it for more than half an hour.)

Making crepes is like riding a bicycle: it takes practice before it’s easy. Expect to completely screw up the first few you make (training wheels!), and keep in mind that while the batter is easy and the technique simple, the error tolerances are actually pretty tight, so don’t get discouraged! Like riding a bicycle, it’s far easier to :: fast; going slow is hard.

Start with a nonstick frying pan over medium-high up the pan for about 30 seconds, or until a drop of water sizzles when dropped into it. Once your pan is at temperature, plan to work quickly: butter, wipe down, pour batter in while swirling, flip, flip again, add fillings, plate, and repeat. Because they’re fast and cheap, crepes are great for dinner parties or brunches, but you should definitely practice beforehand.

Butter: Grab a cold stick of butter with the wrapper partially pulled back, and using the wrapper part as a handle, spread a small amount of butter around the pan.

Wipe down: Use a paper towel to thin out the butter over the surface of the pan, wiping up almost all of it (and on repeats, any crumbs left behind from the previous crepe). The pan should look almost dry; you want a super-thin coating of butter, not noticeable streaks.

Pour: Pour in the batter while swirling the pan. Pour about 1/4 cup / 60 ml of batter into a 10″ / 25 cm pan, adjusting as necessary (you want enough batter to just coat the bottom evenly). While pouring in the batter with one hand, use your other hand to hold the pan in the air and swirl it so that the batter runs and spreads over the surface of the pan. If you can pour batter out of the pan after swirling, you’re using too much. If you’re short on batter, you can “spot pour” a bit in to fill in the gap. This is also the point at which you should check the heat of the pan; it should be hot enough that the batter develops a lace-like quality — little holes all over the crepe as the steam tunnels up through the batter. If your crepes come out whitish, turn up the heat.

Flip: Wait until the crepe begins to brown. Don’t poke, don’t prod; just let it cook. Once the crepe has begun to brown around the edges, use a silicone spatula (one of those folding spatulas works well) to push down the edge all around the circumference. This will release the edge of the crepe so that it lifts off the pan. Carefully grab that little edge to flip the crepe with both hands.

Flip Again: Let the crepe cook on the second side for half a minute or so, until it’s cooked. The first side should come out a uniformly brown tone, so flip the crepe again before adding the fillings. This will leave the better-looking side on the outside of the finished crepe.

Add fillings: Add whatever fillings you like. You can heat and even cook the fillings by leaving the pan on the heat during this step. Or, you can move the crepe to a plate and fill it off the heat if you’re using something cold (e.g., lox, cream cheese, dill). Crepes are a great vehicle for almost any filling, either savory or sweet. If a combination of ingredients works on pizza or in a pie, it’ll probably work in a crepe.

– From Cooking for Geeks by Jeff Potter

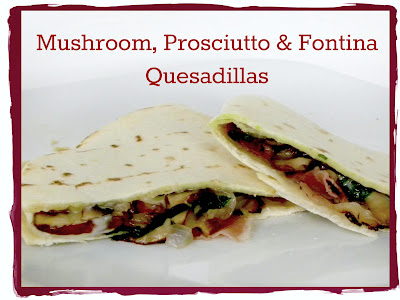
Mushroom, Prosciutto & Fontina Quesadillas

I am all about quick and easy dinners around here. Unless there is a special occasion or I am craving a particular dish, my meals better be ready in thirty minutes or less. But that doesn’t mean they need to come out of the freezer or a box (although sometimes they do — I warned you, I can never be a real foodie).

I read about a zillion cooking magazines, so I don’t quite remember which recipe inspired this dish.  I usually read several recipes and switch them around to what I have on hand.

 Taco night is BIG at our house.  Luckily, anything in a tortilla or wrap can be considered a taco to Kiddo. {Whew}  He  loves this recipe — which he calls mushroom tacos — and the Hubby and I can enjoy a meal with slightly more refined tastes than a box of Old El Paso.


Mushroom, Prosciutto & Fontina Quesadillas

serves 4 (2 adults & 2 children  as 2 tortillas per adult and 1 per child)

  • 6 flour tortillas
  • 6 slices prosciutto
  • 1 small to medium red onion, thinly sliced
  • 1 8-12 oz. package Baby Bella (Crimini) mushrooms, sliced
  •  4 oz. Fontina cheese (roughly about half an 8 oz. wedge) sliced thin (you can grate, but it’s tough because it’s a soft cheese)
  • garlic pepper
  • herbs de Provence
  • a handful of washed baby spinach**
  • 1 tbsp. butter
  • non-stick spray 

 Preheat the oven to 400 degrees.  Lightly spray a large baking sheet with non-stick spray.

     Melt butter in a large skillet. Saute the onions and mushrooms until tender, about 10 minutes.  Toss in the spinach at the last minute to wilt.  Season to taste with garlic pepper and herbs de Provence.

    Meanwhile, spread the tortillas out on the baking sheet. Spread cheese over half of each. Lay a slice of prosciutto over the other halves.

    Spoon the onion/mushroom mixture over the cheese on each tortilla, dividing evenly. Fold the prosciutto half over the mixture and arrange the quesadillas on the baking sheet.

    Bake for 3 minutes. Take baking sheet out of oven and flip each quesadilla. Bake for another 2 to 3 minutes, or until both sides have some brown spots and are slightly crisp.

    Cut each quesadilla in half and serve.

    **I sometimes add zucchini or yellow squash (if I have it on hand) sliced very thinly instead of spinach.  If you use, cook them with the mushrooms and onions for the full amount of time.

    Cheers & enjoy!

    Bombshells and Blueberry Puppy Dogs

    Have I mentioned that I am a Bombshell yet?

    Bookshelf Bombshells is the brainchild of several close friends who have a few crucial things in common: they all read, they all have opinions, and they all have breasts. Clearly, the way forward would be to share all of those things with the Internet (metaphorically so, for that last bit). Thus was born Bookshelf Bombshells, book reviews and author interviews by beautiful, brainy women. Our staff of literate ladies are hot for everything between the covers, from vicious vampires to juicy memoirs, from hard science to soft romance. We lust for the well-written word.

    I was tickled when I was invited to be the Food & Wine Book Reviewer.  A chance to read  cookbooks, foodie memoirs, and drink guides before they are released?  The opportunity to test new recipes before their collections hit the bookshelves? Oh, yeah…I did not have to be asked twice.  I am also the reigning Copy Kitten — which basically means I (along with several other brilliant women) get to proof everyone else’s work. Rather amusing, considering half the time I barely have the chance to proof my own words before I throw them up on this site.

    Of course, I chose to test out the recipe featuring one of my all-time favorite indulgences, limoncello.

    10cl limoncello
    2cl lemon juice
    2cl simple syrup (sugar and water mix)
    1 cup of blueberries
    10cl carbonated water
    A delightful frozen cocktail for hot summer afternoons. In a blender or with a hand blender mix the blueberries with lemon juice, simple syrup, and limoncello until they form a rough slush. Add the carbonated water and freeze for two hours. When ready to serve thaw for twenty minutes and spoon the icy slushy mixture into tall glass. Drink with a straw and maybe garnish with a sprinkle of chopped blueberries.
    -From Slippery Tipples by Joseph Piercy

    Are your lips smacking yet? You know you want to read more. For the full book review (and many more spanning genres from chick lit to urban fantasy with a plethora of others mixed in) head over to the Bookshelf Bombshells site, follow us on Twitter @bookshelfbmshls, or “like” us on Facebook.

      CHEERS!


    Flippant Friday: Pinterest is for Sickos

    I’ve been a little off this week. The first back-to-school cold has hit—not the Kiddo—but me. So I’ve been lucky to get any home-cooked food on the table. No creative cooking for me.

    Since I have been hopped up on Dayquil (non-drowsy—yes, non-hallucinogenic—no) I haven’t been getting much done.  I was actually too out of it to READ. That is nearly impossible. I had to find other pursuits to occupy my long days alone.

    I delved into Pinterest.

    An addiction was born.

    I mean, what better entertainment is there when your eyes are glazed over and you need vast quantities of time wasted?  Thousands upon thousands of neat and nifty gifts, recipes, fashion, decorating ideas flashing right before your eyes in a never-ending stream.  

    And I learned so many vital things this week:

    I am not crafty.

    I take crappy photos.

    I do not know how to accessorize.

    I need to learn to walk in high hells heels.

    I need many scarves and I must learn how to tie them.

    I can dig out all my old jewelry from high school. It’s back in style.

    I am grateful my Grandma gave me loads of vintage jewelry—it’s back in style too.

    I need belts and brightly colored shoes.

    I must work harder to create unique gifts for teachers, relatives, and everyone in my life, because apparently I don’t care enough to send the very best.

    I should spend more time decorating my abode to create a dreamlike home full of tranquility and bliss.

    I should have colored handbags to match all of my colored shoes and accessories.

    I do not know how to decorate for the holidays.

    There are far too many recipes containing cream of chicken/mushroom/celery soup (ick).

    Mad Men brought 50’s dresses and glamor back.

    That glamor can work with tattoos (who knew?).

    I knew I should have been saving all of my wine corks to make cool projects.

    Braids and buns are back in style.

    There are many other Nutella addicts out there.

    I need to save money to travel, so I can’t buy above listed scarves, jewelry, purses, and shoes.

    I need to win the lottery to buy all this stuff and pay someone to dress me, decorate my house, and make crafty things (so I can take all the credit).

    So, instead of cooking, I’ll just link you up with some of the fav recipes I found.

    Pumpkin Cream Cheese Muffins

    Frozen Samoa Pie

    Donut & Nutella Acorns


    Pumpkin Cheesecake Truffles

    Nutella Donuts

    *Absolutely NONE of these are mine, but I DO plan on trying them all out.

    Have you been bit by the Pinterest bug yet?

    TangerineCello Recipe

    “Pure sunshine in a bottle.”

    That’s my favorite description of Limoncello, the refreshing and iconic drink of the Italian Coast. Hubby and I fell in love with the lemon liquor during our honeymoon in Italy. After each dinner (and occasionally even lunch) our cameriere (waiter) would deliver the delightful chilled shot glass of brilliant yellow liquid. Whether sipped or shot, a glass of this elixir leaves you with a slight afterglow, as if you have been kissed by the sun.

    Since we couldn’t stay in Italy forever (oh, how I wish we could have) we had to hunt down our new favorite after-dinner digestivo stateside.  Ten years ago, that wasn’t so easy.  Luckily, a co-worker’s Italian Mother graced us with her family recipe. Making limoncello became Hubby’s passion, nearly an obsession, as he tried to duplicate the taste he so fondly remembered from our lazy days in Italian cafes.

    Don’t worry, we shared. Limoncello became a holiday tradition. Friends and relatives threatened to withhold our gifts if we didn’t give them another years supply under the tree. Yeah, it was that good.

    When we moved into our home we were pleased to discover it came with a mature tangerine tree. It produced bushels of fruit. And we had no idea what to do with all of it. One year Hubby got a flash of culinary brilliance and decided to adapt our Limoncello recipe to use up our bounty of tangerines.

    A new specialty drink was born. And drunk. And enjoyed.

    I’m going to share our TOP SECRET recipe with you. This recipe makes quite a big batch — enough to last you a year (unless you have a wicked drinking problem) and to share. Make it. Your friends will LOVE you…


    Trattoria Morgan’s Tangerine Cello**

     **(to make Limoncello simply sub lemons for the tangerines)


    1 kilo tangerines – 2.2 lbs (about 10)
    1 liter grain alcohol*
    1.25 liters water
    700 grams (3 1/2 cups) sugar

    Step 1

    • Zest tangerines. Take a zester or a fine grater and remove only the colored part of the rind.  *Avoid the white pith — it is bitter and will change the flavor.* (This part is messy, but your whole house will smell like a citrus grove.)
    • Pour the grain alcohol into a large glass jug or jar (must have a lid to seal). Add the zested rind. Let it sit for two weeks. (Yes, it must be glass. Large mason jars or recycled gallon sized wine bottles work well. The citric acids will corrode plastic.)

    Step 2 (two weeks later)

    • In a large pot, bring the water and sugar to a boil. Stir until sugar is completely dissolved. Cool. 
    • Layer some cheesecloth over a mesh strainer and set over a large bowl.  Pour the grain/rind carefully into the strainer, filtering out all of the rind. Pour the (nice orange) alcohol back into the glass jar. 
    • Add in cooled sugar water.
    • Let it sit another week or two. Store in glass or distribute into smaller, decorative bottles. Keep servings in the freezer — it is best ice cold.

    *Many recipes call for vodka, but we prefer grain. Higher alcohol content = no chance of it freezing when you store it in the freezer. But if you can ‘t find grain (I’m told some states won’t sell it?) you can use vodka.

    Take three shots and email me in the morning.
    If you do any more I don’t want to hear from you (and don’t blame your hangover on me).

    Salute! 
    {that’s “cheers” in Italian, you know…}


    Tweet

    potluck recipes, potluck desserts, party dessert recipes

    Party Pineapple Upside-down Cupcakes Recipe

    I don’t know about you, but I always have a tough time trying deciding what to take to a potluck.  Often the hostess doesn’t have enough room to squeeze all the extra food into her fridge (so anything melty or with mayo is out).  Unless you want to bring along your crock pot, anything that needs to be reheated is out too.  And you certainly can’t expect the hostess to bake at 325 degrees for 25 minutes or until golden brown.  Not happening — she has more than enough to do.

    So the search for something not needing refrigeration or reheating yet also memorable and oh-so-edible began…

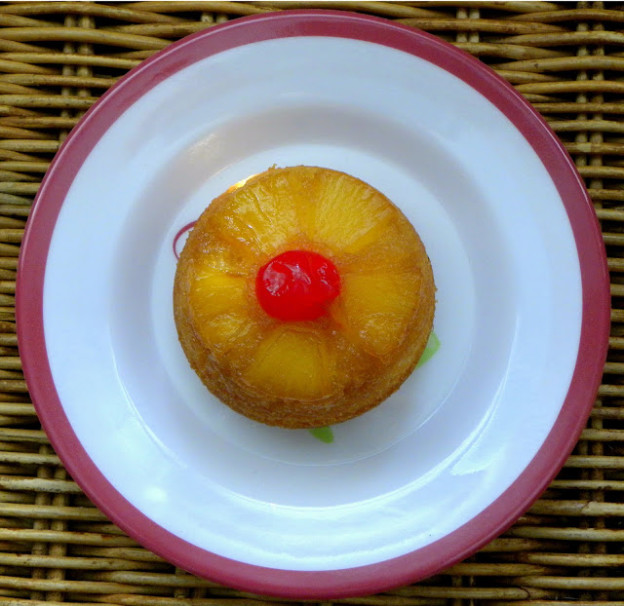
    Aren’t they cute?  An entire tray of them just screams “Eat Me” while looking like an edible arrangement.  Perfect for your next potluck, right?

    Party Pineapple Upside-down Cupcakes

    **Note:  This recipe makes 24 cupcakes in a muffin pan measuring 1 1/ inches deep.  I own two “regular” sized cupcake pans, but one is 1 inch deep while the other  is 1 1/4 inches deep.  If your pan is of the shallower variety you can get 30 cupcakes up the sugar & butter by 1/4 cup to fill the extras.

    For cakes:
    (If you have your own fab recipe — fine, be that way — follow it and ignore this entire section.)
    1 box pineapple cake mix (I used Duncan Hines)
    3 large eggs
    1 1/3 cups water (may replace with pineapple juice – see below)
    1/3 cup vegetable oil
    1 tbsp. spiced rum (optional, but good)

    For topping:
    1 can pineapple slices
    12  maraschino cherries (well-drained and sliced in half)
    1 stick butter
    3/4 cup brown sugar

    1.   Preheat oven to 350 degrees.

    2.   Coat cupcake pan with cooking spray.  (If you feel the need to be fancy and butter each cup, be my guest.) 

    3.  Melt butter in microwave.  Add brown sugar and mix well. 

    4.   Drop about 2 tbsp. sugar/butter mixture in each cup.

    5.   Drain pineapple saving the juice. (For some extra pineapple goodness replace the water called for on the cake mix box with juice.)  

    6.   Slice the pineapple rounds into 8 pieces.

    7.   Place 5-6 pineapple pieces around the edges of each cupcake mold (wide side out, narrow side in).  Stick a cherry in the center (cut side up).  This should look like a flower.  (If not try again.)

    8.   Blend cake mix, water, oil, and eggs in a large bowl at low speed until moistened (about 30 seconds).

    9.    Beat at medium speed for 2 minutes.

    10.  Pour batter into cups, filling each no more than 3/4 full.  This is important.  If you overfill you will get peaked tops and you want tops flat–remember, we are flipping them over.

    11.  Bake at 350 for 21-23 minutes.

    12.  Cool for 5 minutes on cooling rack.  While cooling run a knife around the edges of each cupcake to ensure they are not sticking. Then place cooling rack (if it is as big as your pan–if not use a cookie sheet) over the top of cupcake pan.   Carefully flip and set down.  Gently raise pan (this is the upside-down part).  *Note: cupcakes may drip.  Make sure to have some wax paper or foil below if using cooling rack.

      Arrange on your beautiful serving platter.  Chill until ready to take to potluck.  Watch the “oohhhs” as your friends and family spot your mini delicacies on the buffet line. 


      Get-me-to-the- Greek Pasta Salad Recipe

      Some people can’t keep their hands off a bag of chips, while for others it’s ice cream or Oreos.  My kitchen crack is pasta salad.  I know, that sounds absurd, but there is something about the al dente pasta lightly coated with rich olive oil and herbs that sets off serotonin in my brain.  Grab a piece with a hunk of feta, a sliver of pepperoni, and some crisp, fresh summer veggies at their absolute peak sitting atop and I am in foodie blissdom.

      Summertime just screams for pasta salad.  It’s just too damn hot to eat a heaping HOT bowl of pasta.  And it just so happens there is no other time of year to find grape tomatoes as sweet as candy and peppers (as well as other produce) at prices which won’t break the budget. 

      This was my favorite meal this week.  I could make it in huge vats and eat nothing else…well, as long as I had a nice cool chardonnay to go with it…

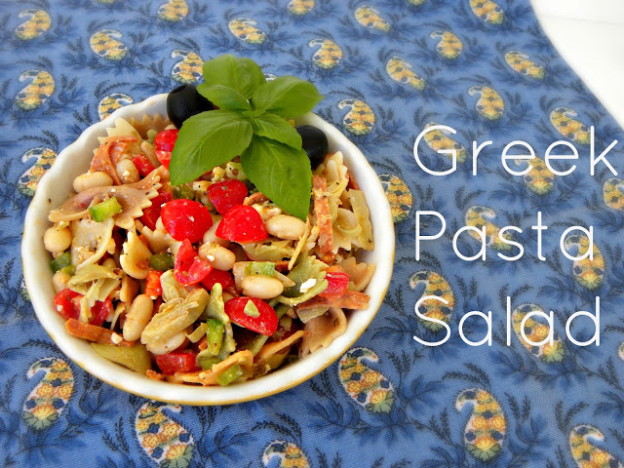
      Get-Me-to-the-Greek Pasta Salad

      serves 6 main dish, 12+ as a side

      Ingredients:

      Dressing:
      1/2 cup extra virgin olive oil
      1/2 cup red wine vinegar
      1 1/2 teaspoons garlic powder
      1 1/2 teaspoons dried basil
      1 1/2 teaspoons dried oregano
      1 teaspoon onion powder
      3/4 teaspoon Dijon mustard
      3/4 teaspoon ground black pepper
      1/2 teaspoon white sugar
      1/2 teaspoon salt

      If you want to make this super quick and easy you can use bottled Greek dressing (Ken’s is decent and I just discovered the Grandessa Signature from Aldi works in a pinch as well). Fresh is best, but I’m not going to tell, and if you hide the bottle, no one else will notice.

      Salad:
      12 oz. dried pasta (I prefer Wacky Mack bow ties for color and texture, but you can use twists, wagon wheels, any shape you like)
      1 pint cherry tomatoes, halved
      1 cup sliced  bell peppers (use any colors you prefer — I like a mix of red and green)
      3/4 cup crumbled feta cheese
      1/4 cup chopped green onions
      1 (4 ounce) can whole black olives, halved
      3/4 cup sliced pepperoni, cut into strips (if you want to go Vegetarian omit)
      1 can white beans (cannellini) or chick peas
      1 box frozen artichoke hearts, chopped and thawed

      Directions:

      1. For the dressing: whisk together olive oil, vinegar, garlic powder, basil, oregano, black pepper, and sugar. Set aside.
      2. Cook pasta as per directions on package for al dente.  
      3. Meanwhile, assemble all other sliced and diced veggies, pepperoni, beans, and feta.
      4. When pasta is done drain well and toss into large bowl.  Add all your salad ingredients and about half of the salad dressing. Toss to coat. Slowly add about half of remaining dressing and toss again. You don’t want everything to be too soggy and saturated with dressing, just gloss and well-coated. 
      5. Cover, and chill 2 hours or overnight. Stir before serving. Add remaining dressing if desired.

      Make sure to hide any leftover in the back of fridge to prevent snacking — yes, it’s just that good.  Just imagine you are sitting {below} soaking in the salty Santorini air while sipping on an imported glass of vino (I’ve heard Greek wine is swill).

      Cheers.

      Now, it’s time for you, my dear readers to join in.

      Triple-layer Fruit & Yogurt Pop Recipe

      Welcome to the new Flippant Foodie Friday feature (ahh, don’t you just love alliteration).   As much as I would love to be a real foodie, it’s just not feasible.  
      1. I’m poor.  As much as I drool over shaved black truffle over any and every expensive gourmet cheese on the market, I just can’t afford these little luxuries. I splurge every so often (real Parmigiano-Reggiano = heaven) but much of my food bill is done on the cheap.
      2. I don’t have a $2,000 camera to snap photos that would make a NYC food stylist drool.  I have a nice little Nikon but I don’t have a studio and lights.  My pictures are decent.  Take them or leave them.
      3. I simply don’t have the time.  This is not a full time gig. Hell, blogging is not even supposed to be my full-time job- I’m supposed to be working on my book.  I can’t spend the whole week repeating a recipe just to make it perfect.  And I have a family.  Yes, I cook every night, but it’s usually Rachel Ray-style – homemade in 30 minutes or less.
      4. I use packaged foods.  It’s the kiss of death for a “real” foodie.  Cake mix is my friend.  The oven is not.  Yes, homemade pasta is 5x better than cheapo from a box, but it just doesn’t fit into my life here and now.  It’s a yearly (if we’re lucky) indulgence.
      5. But I love food.  And I think create some pretty decent dishes. I don’t follow recipes; I generally read several and take bits and pieces of each to make my own creation.  And I’ve been told my creations are pretty damn good, so I thought I’d be generous and share some of the love.  

      Cheers, readers…

      Summertime, and the livin’s easy…and hot…ridiculously hot.  The never-ending heat wave is still gripping the country and local temperatures have been climbing to the upper ’90s every day.  Five minutes outside and you are guaranteed to be dripping with sweat and lusting for an instant cool-down.

      Nothing screams “heat wave treat” more than an icy popsicle…well, I suppose an icy frozen beverage could, but we are talking family treats here at the moment…

      My Kiddo is obsessed with the neon freeze-ice tubes full of frozen chemicles.  Whether they are sold as Otter Pops, Fla-Vor-Ice, or a generic name the concept is the same: high fructose corn syrup, artificial flavors and dye encased in cellophane.  Yum.

      Between the heat wave and orthodontic issues, Kiddo has been going through popsicles at an absolutely rate (faster than I go though wine!).  In an attempt to get a pop with a semblance of nutritional value into him, I decided to try some fruit and yogart pops.

      They may take more time and effort than simply opening a cardboard box and cutting through the cellophane wrapper  but they were nutritious and a tasty hit.  And the blueberries still gave Kiddo the crazy blue tongue (a favorite part of the tube pops) without pumping him full of mystery chemicals.


      Triple-layer Fruit & Yogurt Pops

      Note: Adapted from “Perfect Pops: The 50 Best Classic & Cool Treats,” by Charity Ferreira.

      Prep: 30 minutes
      Freeze: 6 to 8 hours
      Makes: 6 pops

      Ingredients:
      1 cup blueberries (about 6 ounces)
      2 teaspoons sugar
      1 cup low-fat yogurt (I used apple, but lemon or vanilla would also work well–just use your favorite flavor, okay?)
      1 cup strawberries (about 6 ounces)

      6 wooden popsicle sticks (or twigs, craft sticks, or whatever decorative stick you want)

      •  Puree the blueberries in a blender (or food processor) until smooth. With a sturdy spoon, press the mixture through a fine-mesh strainer into a bowl, extracting as much juice as possible. Discard the solids. Whisk in 1teaspoon of the sugar and 2 tablespoons of the yogurt until well combined. Spoon the mixture into ice pop molds, dividing it evenly and filling each mold about one-third full. Freeze until set, 30 to 45 minutes. Wipe spillage off counter because blueberries stain.
      •  Meanwhile, repeat the process used for the blueberries, this time with the strawberries.  Set aside in refrigerator.
      •  Divide the remaining yogurt (about 2/3 cup) evenly among the molds, placing it on top of the blueberry layer and filling each mold another third of the way full. Freeze until the yogurt layer is set, 30 to 45 minutes.
      • Carefully spoon the strawberry mixture on top of the yogurt layer, dividing it evenly. Insert sticks. Freeze until firm, at least four hours or up to one week.
      • To release the pops, run hot water over the outside of the molds for a few seconds; gently pull the sticks.

      Enjoy! 
      (And eat outside. Blueberries & strawberries stain. Let the eater beware.)

      Enjoy!

        Rich, Dark, and Hunky—Chocolate Caramel Brownies


        Rich.

        Decadent.

        Dark. Hunky.

        Sweet.

        Easy.

        Luscious.


        Sounds like the perfect man, right? But it is far better than a man.  It’s silent, scrumptious, doesn’t care what you look like and satisfies you anytime, anywhere. It’s one of my favorite comfort foods from childhood: my Mom’s Magic Camping Brownies.

        Okay, so that title doesn’t quite give them the justice they deserve, so I shall explain.  Growing up we didn’t have much junk food in our house–Oreos were not an after school snack nor did Fruit Loops ever grace our breakfast table (except on my birthday).  But we always had dessert.  Never a Ho Ho or a Twinkie, but a freshly baked portion of utter deliciousness.

        Mom usually reserved these treats for special occasions and baked upon request for parties, school events, and the regular group camping trips.  Forgetting the beer or even breakfast would have been forgivable, but we would have been fed to the alligators if we showed up without the famous brownies.

        When I went away to college Mom sent them in care packages.  What else could a college freshman possibly want when she woke up Saturday “morning” at 3 p.m. than to nibble on a little piece of gooey chocolate and caramel heaven.  They were also popular at late night parties, and once, perhaps while a little intoxicated, I called them “Magic” brownies.  The accidental misnomer excited the party-goers to a near frenzy to grab at the delectable morsels.  They were only slightly disappointed when I insisted they were not, ah em, spiked with special herbs.  But by then everyone was too busy reveling in chocolate ecstasy to really care and the name stuck.

        Mom's Magic Caramel Brownies via kerryannmorgan.comPin It

        Mom’s “Magic” Carmel Brownies

        • 24 kraft caramels (7 oz) unwrapped
        • 1 5 1/3 oz can (2/3 cup) evaporated milk
        • 1 package devil’s food cake mix
        • 1 cup chopped walnuts
        • 6 tbsp. melted margarine
        • 1 small bag (1 cup) chocolate chips
        • Combine all but 2 tbs. evaporated milk, cake mix, walnuts, and margarine; mix well (it will be thick).
        • Spread half the cake mixture in a well greased 13x 9x 2 inch pan.
        • Bake at 350 for 10 minutes.
        •  Meanwhile,  melt caramels and 2 tbs. evaporated milk in a small saucepan over low heat until smooth.
        • Sprinkle half the chocolate chips over the hot baked crust.  Drizzle the melted caramel on top.
        • Drop the remaining cake mixture by spoonfuls all over the caramel and carefully try to cover as evenly as possible (it will still be lumpy).
        • Sprinkle the remaining chocolate chips on top.
        • Continue baking at 350 for 20 minutes more.
        • Cut into bars while still warm (but not hot).
        • Cool in pan.
        • Enjoy.   If you don’t there is something wrong with you.