Category Archives: Recipes

The Southern Cowboy Cookbook Dishes Up Banana Dream Pudding (recipe) and Down-home Charm

In the mood for a fresh take on Southern comfort food? Have I got the cookbook for you.

Born of family, faith, and a passion for making the best blend of Southern barbeque around, one of Orlando’s foodie delights is 4 Rivers Smokehouse. Home of the neon “Hot Brisket Now” sign and lines ringing the building on a nightly basis, the first location in Winter Park, Florida, had humble origins. Back in 2009, businessman and weekend chef John Rivers decided to open a sort-of commissary for his “Barbeque Ministry” in the oft chance locals might want to purchase leftovers from his charitable events, or maybe even order take-out. . .

Five years later, John Rivers runs seven ridiculously successful  locations in Central/North Florida (with a Tampa locale in the works). Though his restaurants are one of the only places my family and I eat out on a regular basis, most of y’all can’t just drop by for a heaping portion of 4 Rivers tender smoked briquet, tangy pulled pork, or to-die-for baked beans (which my dad swears are second only to the beans his mom used to make). Lucky, John Rivers has kindly shared his delectable comfort food recipes in THE SOUTHERN COWBOY COOKBOOK.

The recipes are a bold blend of Deep-South specialties, traditional Texas BBQ, and Low Country cuisine. All of my favorite sides from the restaurant are in there: Smokehouse Corn, Baked Cheese Grits, Bacon-wrapped Smoked Jalapenos, and more.

The meat sections are the highlight of the book, as that’s what draws customers to the casual 4 Rivers Smokehouses, even though they know they’ll have to wait patiently outside in the Florida heat (sometimes an hour), salivating as whiffs from the smoker drift across the sizzling parking lot. (Don’t worry, when the lines are long, the clean-cut and uber polite staff hands out samples to waiting customers.) Rivers includes recipes for all of his signature smoked meats, including the rubs, marinades, and finishing sauces. While these particular recipes might not be that useful unless you have a smoker, chances are you know someone who does. . . And you can share the book with them. . .

Most of the other recipes are much more approachable for the average home cook. The sandwich section reads like the restaurant menu board, highlighting creations that sound odd, but are oh-so-scrumptious, such as the Messy Pig (coleslaw, pulled pork, dill pickles, pickled jalapenos, & BBQ sauce slapped on a sandwich bun). Yes, you need many napkins.

Tossed in with the iconic recipes are some contemporary favorites, like Coffee-rubed Ribeye, Gruyere Herb Biscuits, and Krispy Kreme Bread Pudding. There are just far too many good ones to mention, and most are accompanied by drool-worthy photographs.

John rivers


I had the pleasure of attending a cooking demonstration and cookbook discussion with John Rivers at the UCF Book Festival back in April. He chatted with the audience about his unlikely rises as a successful restauranteur,  why he’ll never franchise (because he doesn’t want the quality and service to waver), his nationwide search for the perfect barbeque, and the role faith, community, and family play in his business and his life.


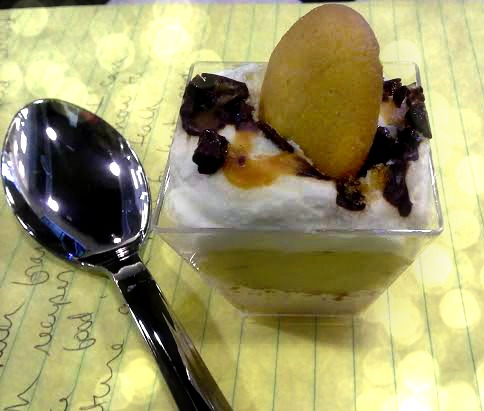
Then he made Banana Dream Pudding Cups and passed out samples to the audience.

Banana Dream Pudding Cups (from the Southern Cowboy Cookbook). Perfect for a potluck! Adding roasted bananas makes all the difference!

Banana pudding is a favorite in my house. The simple Southern specialty is a staple at our Easter potluck, and the bowl is practically licked clean by guests. But John Rivers added a twist I’d never thought of: roasting bananas to bring out the sweetness, pureeing them, then adding them to the standard vanilla pudding. Oh, and adding chocolate. And caramel. And Heath bar bits.

::Swoon::

4 rivers banana pudding

Of course I had to try the recipe at home.

And you can, too.

When you make the puree (I just used my good old mini food processor), blend until you have your preferred consistency. I tried leaving it a little bit chunky, and it added a nice texture to the pudding. Also, don’t use room temp Hershey’s syrup for the chocolate sauce–far too runny and not rich enough. A nice drizzle of hot fudge sauce (homemade or jarred) works much better. And use real whipped cream—it’s worth the few minutes of work.

Banana Dream Pudding Cups (from the Southern Cowboy Cookbook). Adding roasted bananas makes all the difference!

Banana Dream Pudding Cups

From  The Southern Cowboy Cookbook by John Rivers

Serves 6

Banana Dream Puree

5 large bananas
2 tablespoons sugar
1 1/2 cups vanilla pudding (I used instant, but I’m sure homemade would be better)

Banana Dream Pudding Cups

1 cup graham cracker crumbs
1 tablespoon powdered sugar
1 tablespoon unsalted butter, melted
18 (1/4-inch-thick) banana slices
12 tablespoons toffee-chocolate bits (like Heath)
3 cups Banana Dream Puree, divided
1 3/4 cups freshly whipped cream, divided
6 tablespoons chocolate sauce, divided
6 tablespoons caramel sauce, divided
18 vanilla wafers

 Make Puree

Preheat oven to 375 degrees. Lay bananas, unpeeled on a baking sheet and bake for 10 to 15 minutes, or until bananas turn dark brown and go soft. Allow bananas to cool before peeling.

Peel bananas and place in the work bowl of a food processor along with the sugar. Pulse until desired smoothness.

Add pudding to bowl and mix by hand until combined. Refrigerate until cold.

 Make Pudding Cups

Combine graham cracker crumbs, powdered sugar, and melted butter in a bowl, and mix until well blended.

In each of 6 glass dishes (I used stemless wine glasses), place 2 tablespoons graham cracker mixture, then top with 3 banana slices and a tablespoon of toffee-chocolate bits.

Spoon in 1/2 cup puree, then top with 1/4 cup whipped cream.

Sprinkle with 1 tablespoon toffee-chocolate bits, and drizzle with 1 tablespoon chocolate sauce and 1 tablespoon caramel sauce. Refrigerate until ready to serve.

Place 3 vanilla wafers around each rim just before serving.

 *******

The Recommendation:

Buy it. The cookbook is worth the price just for the Thanksgiving menu, which I plan on making for my holiday celebration this year. (Potential guests, expect Prosciutto Brussels Sprouts, Southern Green Beans, and Smoked Turkey.)

Now that I’ve spent the hour salivating over the cookbook and dreaming of BBQ and banana pudding, I’m going to head off to the gym—possibly with a detour afterwards to pick up some 4 Rivers takeout.

The Details:

The Southern Cowboy Cookbook by John Rivers
Print Length: 223 pages
Publisher: Story Farm

https://4rsmokehouse.com/

Weekend Cooking hosted by www.BethFishReads.com


Joining up again with Weekend Cooking hosted by www.BethFishReads.com. If you’re interested in more food-related posts, drop on by!

Escape to the French Countryside with a Peter Mayle book and Provençal Beans and Orzo {recipe}

I often dream of stuffing a couple of suitcases with sundresses and books and escaping to an old farmhouse somewhere in the hills of Provence. I imagine lingering around a vintage table with a glass of local wine, my belly full of some fresh and exotic meal. Later I’d wander along a dirt road to some quaint village, passing fields of lavender and sunflowers.  Every day a postcard: vivid blue skies juxtaposed against green vineyards, basking by the backyard pool after a morning of writing and gardening, a trip to town to procure vegetables still warm from the earth to create dinner…la belle vie.

It’s no surprise I fell in love with Peter Mayle’s books from the first sentence.

“The year began with lunch.”red beans and orzo

Provence must be a gastronomic paradise.

If you haven’t read Mayle’s warm and witty chronicles of his “foray into Provençal domesticity” you should. The charming blend of memoir, travelog, and home improvement manual will make you fall in love with the region—despite the wicked winds of the Mistral, plagues of summer tourists, and the local’s proclivity for frog legs and offal. You’ll want to buy the 200-year-old farmhouse next door, with Englishman-turned-Francophile Mayle for a neighbor, of course.  His Provence novels are delightful, light reads as well—perfect for a spring day with a glass of  Pastis by the pool.

Zut alors! I just discovered he released a new book in April. Off to buy—Amazon gets all of my money.

Provence in Ten Easy Lessons: From Provence A-Z: A Francophile’s Essential Handbook (Vintage Departures)


Mais oui, here in the Sunshine State, spring means a yard overflowing with blooms, beach time, and lazy days off by the pool. It also means the thermometer will start racing towards triple digits, so my oven will be retired until late fall, and some days it’s just no fun to hang over a hot stove for long.

It’s time for lighter fare—perhaps with a Provençal flair…

We spend every free moment in the backyard or by the water, knowing that the bugs and the heat will trap us inside within a few weeks. Since I’m working outside the home for the first time in years, my meal prep needs to be simple, efficient, and easy.

Time to share one of my favorite meals that fits all those categories: Provençal Beans and Orzo.

It’s pretty dang delicious, too.

Made from mostly panty and freezer staples, this is a meal I can whip up on short notice that always has my family saying, “Ooh la la!”  The prosciutto/speck/ham adds plenty of salty goodness, so you probably won’t need to add much salt. Serve with some warm and crusty French bread and some wine and you’re ready for company.

 Provençal  Beans and Orzo

Provençal Beans and Orzo

30 min (including prep) | Serves 4

Ingredients:

1 3/4 cups orzo
3 cups chicken broth (or 1 14 oz can + 3/4 cup water)
1 small onion chopped (about 12 – 3/4 cup)
1 15-oz can kidney beans
1/2 cup (about 2-oz) prosciutto, speck, or high-quality ham, chopped
1 bag fresh baby spinach, chopped (or 1/2 box frozen, thawed and drained)
1 teaspoon herbs de Provence
1/2 cup Parmesan cheese*
splash of olive oil

Directions:

  1. In a large pot, saute onion until slightly translucent, about five minutes. Add chicken broth and bring to a boil. Sir in orzo and herbs de Provence.
  2. Boil gently, covered, for 10 minutes. Stir regularly. (If mixture looks too dry at any point, just add water gradually.)
  3. Toss spinach on top. Cook an additional 2 to 5 minutes or until orzo is tender and most of liquid is absorbed.
  4. Add beans and prosciutto (or ham). Stir until heated through. Season with salt and pepper to taste.
  5. Dish into bowls and top with cheese.*

I’ve used Asiago cheese instead of Parmesan—délicieux!

Bon Appetite, mon amies!!

For more inspiration, check out some of my favorite Peter Mayle books:


http://4.bp.blogspot.com/-ZE9Ys6bVuq8/UddOPoyqBaI/AAAAAAAAOk4/VpkCi4QiTJg/s1600/wkendcooking.jpgWeekend Cooking At www.bethfishreads.com is open to anyone who has any kind of food-related post to share: Book (novel, nonfiction) reviews, cookbook reviews, movie reviews, recipes, random thoughts, gadgets, quotations, photographs. If your post is even vaguely foodie, feel free to grab the button and link up anytime over the weekend.


Sweets for your sweetie: Cherry Cordial Brownie Bites

You can never have too many brownies. Or at least, I can never have too many brownies. Ever since I discovered the handy-dandy method of baking them in mini-muffin pans, I always keep some tucked away in the freezer for chocolate emergencies. (Don’t laugh. Chocolate emergencies are a real thing.)

I actually came up with this recipe at Christmas time after I’d sworn I wasn’t going to bake cookies from scratch. In the past, I’ve spent days making dozens of dozens of homemade treats for bosses, teachers, and friends, but this year I just didn’t have the time. I aimed for the semi-homemade route, which if dressed up properly, can be just as tasty and ten times easier.  I wanted to do something with brownies…cherry cordial candies were my dad’s favorite, and always under the Christmas tree…how about cherry cordial brownies?

I searched for a recipe to imitate that rich, creamy deliciousness with a gooey cherry inside, but I couldn’t find exactly what I was looking for. I did find an intriguing Cherry-Merlot Brownie Bite recipe via Betty Crocker. Hmmm…not quite…  After a few tweaks, it was better than I dreamed!

cherry cordial brownie recipe

By switching out the Merlot for Amaretto, the brownies took on the creamy, cherry almond cream taste I was going for. These things are AMAZING!  Chewy, rich, and OMG good!  (Hold on a sec—I have to go eat one now!) They will make a perfect Valentine’s Day treat for your Sweetie (or yourself!)

Can you tell I’m seriously in love with these?  And they are seriously easy.

cherry cordial brownie bites

Cherry Cordial Brownie Bites

1 bag (about 5 – 6 oz.) dried cherries
about 1/2 cup Amaretto liqueur
1 box brownie mix (I recommend Betty Crocker Supreme Triple Chunk or Ghirardelli Triple Chocolate)
1 egg*
1/3 cup oil*
water to fill***

  • Place cherries in a microwave safe bowl. Add Amaretto so that it about covers the cherries (you can add a little more if necessary). Microwave on high for 90 seconds. Set aside and let cool about 10 minutes.
  • Heat oven to 350°F (325°F for dark or nonstick pan). (optional) Place mini paper baking cup in each of 48 mini muffin cups. (I have bake in two batches, so liners are easier for me.)
  • Strain cherries, pouring leftover Amaretto into a measuring cup. Check how much water your brownie mix box calls for (mine called for 1/4 cup of water). ***Use the Amaretto instead of the called for water. If you don’t have quite enough, add water.
  • In a mixing bowl, add brownie mix, Amaretto/water, * EGG(S), AND OIL ON CALLED FOR ON BROWNIE MIX BOX. Stir until mixed.
  • Fold in the cherries. Mix.
  • Fill each muffin cup with about 1 tablespoon batter/about 3/4 full. (I use a cookie scoop.)
  • Bake 18-21 minutes. Let cool in pan a few minutes, then remove each brownie bite to a cooling rack.

*Tip from Betty Crocker: If a recipe yields more mini cupcakes than your pan will make, cover and refrigerate the rest of the batter while baking the first batch. Cool the pan 10 to 15 minutes and then bake the rest of the batter, adding about 1 minute to the bake time.

*Since the cherries make them a little gooey, the paper wrappers may stick. Optional.

Happy Valentine’s Day

&

Cheers, my friends!

Cranberry Orange Quick Bread

The adults in my family are not big on holiday presents. Most of my relatives don’t “want” anything, and they have no desire to spend days (and a huge chunk of change) tracking down stuff at the mall. We DO enjoy exchanging food gifts—usually homemade (though no judgment is passed if we get a tasty gift basket of treats)—because everyone likes food.

Last year my grandmother decided we all would exchange homemade breads, and a new family tradition was born. I knew most of my usual repertoire would be made by my relatives—pumpkin bread, zucchini bread, banana bread. . .  I searched for a unique recipe I knew no one else would make.

Our neighbor’s tangerine tree hangs over our yard.  We usually zest our small harvest so we can make Tangerinecello—our Florida a variation on the Italian Limoncello. (check out those recipes here and here!) I searched for a way to incorporate our home-grown sweet citrus.

Orange —> tangerine + Christmas. . . how about some Cranberry Orange Bread?

Great gifting: Easy Cranberry Orange Quick Bread. My friends and relatives insist I make this for them each year!

I fell in love with these paper trays and bags. I think they were from the Martha Stewart line, found last year at Michael’s (1/2 off, of course!) They made my breads look totally gift-worthy!

The bread was a total hit.

It’s rich, reminding me more of a light pound cake than the usual quick bread (must be all that butter).  I could devour it for dessert. (Ooh, with a touch of ice cream on top I’d be in heaven!)  Or you could whip up a quick glaze—I didn’t because my little breads had to travel.

It’s pretty easy, slightly decadent, and totally gift-worthy. Not to mention rather festive looking, and perfect for Christmas brunch or breakfast.

cranberry orang quick bread

2 cups all-purpose flour
3/4 cup sugar
1 1/2 teaspoons baking powder
3/4 teaspoon salt
1/2 teaspoon baking soda
1/4 cup butter, softened
1 tablespoon orange (or tangerine) zest
3/4 cup orange (or tangerine) juice
1 egg
1 cup cranberries (fresh or frozen)
  • Grease/spray bottom of a 8×4 or 9×5 loaf pan (skip if you’re using paper baking pans).
  • Mix flour, sugar, baking powder, salt, and baking soda. Add butter (I like to chop it into bits) and mix until good and crumbly.
  • Add zest, juice, and egg; stir until moistened. Fold in cranberries.
  • Pour batter (it will be thick) into pan and bake until a knife comes clean from the center.
  • For a 8″ loaf, about 75 min; for a 9″ loaf, about 55-65 min at 350F (watch after about 50 min, depending on your oven).
  • Loosen sides from pan, remove, and cool completely.

*Optional GLAZE*

Mix 1 Tbsp. orange juice, 1 cup sifted powdered sugar, and enough extra orange juice to get it to a “drizzly” consistency. When cake bread is completely cool, drizzle over top.


Cheers and enjoy!


Mama's Losin' It


I’m linking this holiday tradition up with Mama Kat. Drop by and see her!

Mom’s Classic Apple Cake

When the air turns crisp and hints of cinnamon perk your nose when you step inside, it’s usually apple season. While I have an apple pie recipe I absolutely adore, one dessert that always makes me think of home is my Mom’s Apple Cake. Growing up, when the Florida temperatures dipped just enough to make if feel like Christmas (into the upper 60s—maybe), Mom would bake her old-fashioned apple cake for friends and family.

Honestly, I forgot about the classic for a few years. I’d been focused on trying out fancy Christmas dinner desserts, which were usually pies, and figuring out new Christmas cookie recipes—cake didn’t come to mind. Then Mom made it for our annual family holiday luncheon, and the memories flooded back.

And I realized I’d had her handwritten Apple Cake recipe all along.

I made the moist, delicious cake for our very small Thanksgiving celebration this year. Since the recipe makes a 9 x 13 cake and there were only four of us, we had a week’s worth of leftovers.

It was so good, I’m making it for our big Christmas shindig, too.

This cake is a keeper—not just because it’s delicious, but because it lasts forever in the fridge. The flavors become richer and the cake moister. I’d definitely recommend making it at least a day ahead of serving, which makes it the perfect dessert for holiday planning!

You can serve it topped with whipped cream, a light dusting of powdered sugar, or some warm caramel sauce. Or you can spread a layer of rich cream cheese frosting on top. I’ve had it each way (and in varied combinations) and it’s delicious even with no toppings. My current fav is caramel and whipped cream.

You can use any variety of apples you like—I usually go for Granny Smiths, but Gala’s were on sale, and they worked beautifully. Raisins and walnuts are optional. (I know—people are either team raisin or not.) I added some golden raisins this year—perfect!. For my Christmas cake, I think I’ll soak them in brandy before adding them for an extra kick!

classic apple cake

Mom’s Classic Apple Cake

Ingredients:

3 eggs
1 3/4 cups sugar
1/2 cup vegetable oil
1/2 cup applesauce

1 tsp. vanilla

2 cups flour
1 tsp. salt
1 tsp. baking soda
1 1/2 tsp. cinnamon
pinch of ginger

2 cups peeled and diced apples (about 3-4)

*1 cup raisins (optional, but I always add)
* 1 cup chopped walnuts (optional)

Directions:

  • Grease and flour a 9x13x2-inch baking pan. Preheat oven to 350 degrees.
  • With an electric mixer, blend first four ingredients in a large bowl.
  • Add vanilla.
  • Mix next four ingredients (dry) in a separate bowl. Slowly add to wet ingredients, mixing by hand until thoroughly combined.
  • Add in apples (and optional raisins and walnuts). Fold into batter until well incorporated.
  • Pour into pan and bake for 1 hour.
  • Cool completely before covering and store in refrigerator.

Once cooled, you can frost with cream cheese frosting OR finish with a big dollop of whipped cream. It’s absolutely divine with a drizzle of caramel sauce, too!


Cheers and enjoy!


Pumpkin Gingersnap Cheesecake (Full Size and Minis)

Pumpkin Gingersnap Cheesecake - delish!Okay kids: we only have ONE week left to go pumpkin crazy. One! The Christmas countdown is already in full-swing, and those eggnog and peppermint treats have already booted out our favorite fall flavors in so many places (I’m taking to you Starbucks).  There’s still a little time left enjoy Pumpkin Season and plan your Thanksgiving menus. This desert could be the star of your Turkey Day meal.

I love cheesecake. I love pumpkin. (duh!)  And gingersnaps make my tongue dance with delight—I’ve been adding ginger to everything lately. Combine them all and you get a delish dessert perfect for crisp a fall evening or your Thanksgiving feast.

The original recipe is for a normal 9-inch cheesecake, made in a springform pan. When my hubby informed me he had to bring a dessert to his office’s Thanksgiving potluck (he works for the State— everything is a potluck) I decided to make a batch of cupcake-sized treats. The same recipe, except for a few minor alterations, turned into 24 adorable individual desserts—perfect for a holiday potluck.  They were the hit of the party!

Both recipe variations are easy to make. I highly recommend crumbling the crispy gingersnap cookies in a food processor. It saves a ton of time and makes the cookies a fine, even consistency. (The good old-fashioned method involves placing the cookies in a giant bag, then bashing and rolling them with a rolling pin.)  I also like a LOT of “spice” in my pies, so if you enjoy a more subtle flavor, just add a pinch less cinnamon, cloves, nutmeg, and ginger.


How about some Pumpkin Gingersnap Cheesececake? Easy and delish!  Perfect way to impress your Thanksgiving guests. #thanksgivingrecipes #pumpkinpie

Pumpkin Gingersnap Cheesecake  (using 9-inch pan)

Ingredients:

Gingersnap Crust:
2 cups gingersnap cookie crumbs (about 1 box)
6 tablespoons of melted butter
1 tablespoon sugar

Filling:
2 (8 oz) packages of cream cheese, room temperature
3/4 cup brown sugar
3 eggs
1 (15 oz) can pumpkin
1 tablespoon flour
2 1/2 teaspoons vanilla
1 1/4 teaspoons cinnamon
3/4 teaspoon ground ginger
1/2 teaspoon nutmeg
1/2 teaspoon ground cloves

Whipped cream for topping, if you like (I like!)

Directions:

  • Preheat oven to 350 degrees.
  • Crust: In a large bowl, mix cookie crumbs, butter, and sugar. Pour into 9-inch springform pan. Press FIRMLY into bottom of the pan (I use the waxed paper butter wrapper to keep crumbs from sticking to my hand). Bake for 5 minutes. Remove from oven and set aside.
  • Filling: In another large bowl, beat cream cheese and sugar with an electric mixer until fluffy. (If your mixer is old like mine, start on low than up it to medium or high).
  • Add eggs one at a time. After each egg, gently beat on low speed until just incorporated.
  • Add spices, pumpkin, flour and vanilla. Beat until well blended and no lumps remain.
  • Pour into crust.
  • Bake 50 minutes, or until a toothpick comes out almost clean. Let cheesecake cool in pan at least one hour. Refrigerate once cooled (at least 4 hours before serving, preferably overnight).
  • If necessary, run a knife along inside edge of pan to loosen before removing outer upper part springform pan.
  • Serve with whipped cream & enjoy!


These mini pumpkin gingersnap cheesecakes are adorable and delish! Perfect fall recipe—great for potluck parties and your Thanksgivng feast. #potluckrecipe #Thanksgivingdessert #pumpkinrecipe

MINI Pumpkin Gingersnap Cheesecakes

Makes 2 dozen single-serving cakes

This goes pretty much the same as the recipe above with a few exceptions (differences are in dark red).

Ingredients:

Gingersnap Crust:
1 1/2 cups gingersnap cookie crumbs
4 tablespoons of melted butter
1 tablespoon sugar

Filling:
2 (8 oz) packages of cream cheese, room temperature
3/4 cup brown sugar
3 eggs
1 (15 oz) can pumpkin
1 tablespoon flour
2 1/2 teaspoons vanilla
1 1/4 teaspoons cinnamon
3/4 teaspoon ground ginger
1/2 teaspoon nutmeg
1/2 teaspoon ground cloves

Whipped cream for topping, if you like (I like!) mini cheesecakes before Directions:

  • Preheat oven to 350 degrees.
  • Crusts: In a large bowl, mix cookie crumbs, butter, and sugar. Place 24 cupcake liners into cupcake pan(s). Scoop about 1 tablespoon of crumb mixture into each liner until it’s divided evenly. Press FIRMLY into bottoms (I use the waxed paper butter wrapper to keep crumbs from sticking to my hand). Bake for 5 minutes. Remove from oven and set aside.
  • Filling: In another large bowl, beat cream cheese and sugar with an electric mixer until fluffy. (If your mixer is old like mine, start on low than up it to medium or high).
  • Add eggs one at a time. After each egg, gently beat on low speed until just incorporated.
  • Add spices, pumpkin, flour and vanilla. Beat until well blended and no lumps remain.
  • Pour into cupcake pan, about 1/4 cup in each liner, until nearly full.
  • Bake 20 to 25 minutes, or until a toothpick comes out almost clean. Let cheesecake cool in pan at least 1 hour. Refrigerate once cooled (at least 3 hours before serving, preferably overnight).
  • Serve with whipped cream & enjoy!

**These recipes are derived from a McCormick Spice ad I found in my Sunday paper.

Weekend Cooking hosted by www.BethFishReads.com


Easy Harvest Pumpkin Spice Cake with Maple Cream Cheese Frosting

Yes. I am one of those people who just can’t get enough pumpkin. While I don’t drive to Starbucks to sate my craving, I do savor the dollop of pumpkin spice creamer I pour into my home-brewed coffee each fall morning. (Sorry, I can’t fathom driving and waiting in a line before I’ve had a cup of coffee.)

In my semi-homemade world, I go big on pumpkin in October and November. Besides store bought pumpkin coffee creamers, bagels, and cream cheese, I make pumpkin muffins, breads, pies, and CAKES.

Craving something chock full of fall flavors? Try this super easy pumpkin spice cake. It’s so simple your kids could make it. Seriously. (And you’re kind of sneaking in a helping of fruits/veggies!)

Pumpkin cakes come out moist and slightly dense, so I prefer to bake them in a 9 x 13 pan. And this frosting—yum. It’s much better if you use real maple syrup (Aunt Jemima won’t cut it here).


SUPER Easy Harvest Pumpkin Spice Cake with Maple Cream Cheese Frosting

Easy Pumpkin Spice Cake

1 (18.25 oz) box spice cake mix
1 (1 lb) can pumpkin
3 eggs
3 tablespoons Grand Marnier (or orange juice)
3 tablespoons water

  • Preheat oven at 350 degrees. In a large bowl, combine all ingredients. Beat at low speed with an electric mixer for 30 seconds (or until just blended), then on high for 2 minutes.
  • Pour batter into greased (bottom only) 9 x 13 pan. Bake 30-35 minutes (check bake time on cake mix box).
  • Cool. Frost with Maple Cream Cheese Frosting.

Maple Cream Cheese Frosting

1/4 cup butter
1 (8 oz) package neufchatel or cream cheese
1/4 cup pure maple syrup
4 cups powdered sugar

  • In large bowl, blend butter and cream cheese with a mixer on low speed. Add maple syrup; blend well.
  • Add powdered sugar slowly. Beat well after each addition so it doesn’t fly everywhere.
  • Ice & enjoy!

That’s it! Told you it was easy! Perfect for holiday potlucks and gatherings.

Cheers!

**this recipe is based on one from Quick Fixes with Mixes by Lia Roessner Wilson

Want some more pumpkin recipes? Check out:

pumpkin pineapple muffins


Pumpkin Pineapple Snack Muffins (my kiddo’s fav snack!)


poke cake recipes


Pumpkin Cheesecake Poke Cake


Weekend Cooking hosted by www.BethFishReads.com

Italian Wedding Soup

Late in October, the roasting Florida temperatures ever so slowly begin to creep down a few degrees. Not by much—while we watched snow falling on the news the other day, we cheered because it would be in the upper 60s for the morning bus stop walk—but it’s enough of an excuse for me to crave a steaming bowl of comfort.

I would eat Italian wedding soup every single day for lunch if I could. Actually, for years, I kinda did. Don’t lash me with a wet noodle, but I helped keep Progresso in business with my rations of their canned soup. I know, I know. . . high in sodium, preservatives, and mega-processed. . . but it was easy, relatively low-cal, and yes, yummy. (Except for the one time I opened a can, and it contained no meatballs. NO MEATBALLS. Yes, I wrote the company. That’s like getting a twinkie with no cream. The horror.)

It was time to stop being lazy and make my own.  My son had a sore throat, and nothing makes you feel better than a pot of homemade soup. And I’ll use any excuse to break out my grandmother’s vintage Cousances pot. It’s just so dang pretty and steeped in history. If pots could talk…

The result was a total win. I’m never going back to canned soup. Well, once I run through all the cans in my pantry. Shhhhh!

Italian wedding soup, turkey meatballs, meatball soup

This is a hearty soup fit for a meal, not a thin little side dish or starter. No wimpy can of chicken noodle consistency, where there’s more broth than bite. My family says I don’t make soup, I make stoup (I think we stole that from Rachael Ray?).

Italian wedding soup, couscous

 I had a Costco-sized bag of pearl couscous. It’s the same shape as the cute acini de pepe pasta, and I had a ton (okay, just a few pounds), so into the soup it went.

Italian wedding soup ingredients, mini turkey meatballs

I also am a firm believer that zucchini can go in just about anything. Seriously—sometimes it shows up in fajitas, quesadillas, and spaghetti sauces—tossing some in soup is a given. Beans follow the same rule. Extra fiber and veggies for everyone! Toss them in!


Italian wedding soup

Italian Wedding Soup {with mini turkey meatballs}

Serves 8

Ingredients:

Soup ingredients:

1-2 tbsp olive oil
2/3 cup carrots, sliced
1 large onion, chopped
1 medium zucchini, chopped
1 can cannellini or great northern beans
2 cloves garlic, minced
2 tsp dried basil
1 1/2 tsp dried Italian seasoning
1/2 tsp salt
1/2 tsp ground pepper
1/4 cup white wine (optional)
8 cups chicken broth
6oz baby spinach, chopped
1 1/2 cups pearl couscous or small pasta
Parmesan or Romano cheese for serving

Meatball ingredients:
1lb ground turkey
2 tbsp milk
1 egg
1/4 cup Parmesan cheese
3/4 cup  breadcrumbs
1/4 tsp salt
1/2 tsp garlic pepper pepper
1/2 tsp red pepper flakes
1/2 tsp Italian seasoning

  1. In a heavy-bottomed soup pot, heat olive oil. Add carrots and onions; saute for 5-8 minutes or until softened. Add garlic; cook 2 minutes more.
  2. Add wine; cook down for 2 minutes. Add broth, heat to slow boil.
  3. Add zucchini, seasonings, pasta/couscous, and meatballs**. Cook for about 10 minutes, or until your pasta is tender.
  4. Add chopped spinach, stir through until wilted, about 2-4 minutes.
  5. Once in individual bowls, sprinkle with cheese (optional, but who doesn’t like cheese?)

*Meatballs

  1. Preheat oven to 350 degrees. Line a large baking sheet with non-stick aluminum foil (the best invention ever) or regular foil and coat with non-stick spray.
  2. In a large bowl, combine all ingredients well. Using a rounded 1 tbsp measuring spoon or small melon baller, scoop out meat; shape into small balls. Makes roughly 100-120 meatballs, depending on how small you make them.
  3. Place meatballs on baking sheet, making sure they don’t touch. Bake for 10 minutes.

italian wedding soup, turkey mini meatballs,

I made the meatballs earlier in the day (they take about a half-hour, but I was slightly distracted by House Hunters International to note the exact amount of prep time.) You can make them while the soup cooks. It’s soup—it can simmer for a long time.

**You can cook the meatballs in the soup. Drop them in one at a time, and they will cook in about 10-15 minutes. I prefer to cook them separate because I don’t want the extra fat and didn’t want to risk undercooked meat.

Now, go make a pot. You won’t be sorry 😉

Cheers!

Need some more delicious soup recipes? Check out these favorites:

Easy French Onion Soup

Easy French Onion Soup


Curry and Wild Rice Soup (vegan)

Curry and Wild Rice Soup (vegan)

Super Simple S’mores Bites

These are so easy, we can’t consider this a “recipe.”  Instead, let’s call these “directions.” Super simple directions. Like, you can train your kids to make these themselves directions.

But dang, these things are good.

Last Saturday Kiddo celebrated his last soccer match of the season with a party at the Springs. We were supposed to bring our own picnic, but since my hubby is the assistant coach, I thought it would be nice to bring an extra treat for the team.

Thursday night after work I combed through Pinterest for something super simple to make. Note: I did not write “bake.” I haven’t been getting home until nearly eleven p.m. and my Saturday morning was booked. Oh, and I needed to have all ingredients on hand. No time to hit the store.

Complicated was out — but cute was in.

I found several versions of these adorable little dudes. Call them S’mores Bites, S’mores Cookies, S’mores Treats—I call them delish.  And so did everyone at the party.

Seriously, these things were a hit. I stuck them on a recycled catering tray. (NEVER throw a catering tray away. I reuse them for everything.) The ooohs and ahhhs hit immediately. The kids hovered around the tray, begging me to let them attack. Three dozen treats disappeared in two minutes. I barely snagged one.

All the parents asked me where I bought them. {giggle giggle} 

Total crowd pleaser. These baby’s are my new potluck go-to.

They are simple enough to make for  an after school snack or late night attach of the munchies. THREE ingredients. I happened to have caramel-filled Hershey’s Kisses in my freezer (leftover from some Christmas project, I think) and they worked perfectly, adding an extra layer of oozy-gooeyness to each bit. Heaven.

I also just so happened to have a biscuit cutter on hand to make the rounds. No idea why. I’ve never made or intend to make a biscuit from scratch. Ever. Cutting the graham crackers into rounds is not necessary (especially if you’re making these for a quick snack) but it does make them appear a bit more professional. Just in case you want to impress the other soccer moms or your kid’s teacher.

Kiddo helped make the first batch (without complaints!) and could have done the whole bit by himself. You can make four or four dozen in minutes. And if you’re making a small batch, just pop them into the toaster oven—as I did just minutes ago.

Easy-peasy.

Pin It
Super Simple S’mores Bites

makes 24 (but you’ll want more)

12 graham cracker sheets (or 24 digestive biscuits)
12 large marshmallows
24 unwrapped Hersey’s Kisses (the caramel-filled are PERFECT, but use any variety)

  • Using a round cookie or biscuit cutter, cut 2 rounds from each full graham cracker sheet.
  • Cut each marshmallow in half keeping the flat sides whole. (Put them in the fridge first. Makes much less sticky.)
  • Place graham crackers on cookie sheet. Top with marshmallow (cut side down).
  • Broil for about 2 minutes. Depending on how hot your oven gets, they could brown up quicker. I’d suggest checking every 30 seconds.
  • Take out of oven and immediately press a Kiss into the center. Make sure to press, because that’s what glues it all together.
  • Cool. Enjoy warm or room temp!

*I based this off directions on Classy Cooking, but there seem to be many versions of these out there.

Pin It

Betty Goes Vegan: Curry and Wild Rice Soup

Last week I told you about my dalliance with VEGAN cooking via the Betty Goes Vegan cookbook. {Check out the full review HERE. Trust me, it’s worth it.}  Again: I’m NOT vegan. The Limoncello Bundt Cake baked like a science experiment—and yes, by some miracle of food processing chemistry, I can bake a cake with powdered egg replacer. Who knew?

The next day I was sick and craving soup. While perusing the 500+ recipes I spied Curry and Wild Rice Soup. This authors proclaimed the recipe was “one of those soups people expect in a vegan cookbook.” It called to me. I had all of the ingredients on hand after a weekend trip to the farmers market.The recipe contained for no faux meat (scary), but was loaded with fresh veggies and antioxidants (woo-hoo!). And garam masala turns me on—the scent alone can make my heart flutter.

As advertised, the finished product was easy to make and pretty awesome. Not particularly hot or spicy (but that’s just my taste—some people definitely would have zinging tongues). And it was even better the next day for lunch.

See that gorgeous pot pictured above? This recipe marked the debut of my *new* vintage Cousances Dutch oven, graciously passed down from my grandmother. I’m in love with it. Each time I use it, I imagine the dishes my grandmother prepared in it as she traveled through Europe years ago.


Pin ItCURRY AND WILD RICE SOUP
from Betty Goes Vegan: Over 500 Classic Recipes for the Modern Family

Makes 4 to 6 bowls (made 3 to 4 lunch sized bowls for me)

1 tablespoon olive oil
1 tablespoon all-purpose flour
4 cups Better Than Boullion vegetable broth, made per package instructions
3 1/2 teaspoons of garam masala curry powder
1/2 cup coconut milk
1/2 cup frozen peas
2 cups cooked wild rice
1 cup raw broccoli florets
1 red bell pepper, sliced
1 teaspoon crushed black peppercorns
5 large fresh basil leaves, chopped
1 teaspoon lemon zest
2 teaspoons lemon juice

In a large stewpot or Dutch oven, heat the olive oil over medium heat until warm. Use a whisk to blend in the flour. Once the flour and oil have made a paste, add the broth and continue to whisk your soup until the flour has blended in. Add the curry powder and coconut milk and continue to whisk until the curry powder has blended into the soup.

Toss in the peas, wild rice, broccoli, and bell pepper and simmer until the vegetables are tender. With a large wooden spoon, mix in the black pepper, basil leaves, lemon zest, and lemon juice.

Serve warm and often.

Photobucket
Full Book Review HERE


Betty Goes Vegan: Over 500 Classic Recipes  for the Modern Family
Annie & Dan Shannon
Grand Central Life & Style
$26.99 (hardcover), $10.67 (Kindle) 480 pages