Category Archives: Recipes

Betty Goes Vegan: Limoncello Bundt Cake

AM NOT VEGAN. Nor do I have any intention of becoming a vegan. But the whole concept of Betty Goes Vegan: Over 500 Classic Recipes  for the Modern Family intrigued me, so I reviewed it for Bookshelf Bombshells.

How can Betty Crocker, the BFF of every pearls-and-apron wearing 50s housewife be cool—and vegan? In a few words— if you are vegan, you need this book. If not—it’s clever, loaded with comfort food (even vegan venison! eek!), and full of enough geeky Star Wars references to make anyone laugh.  {Check out the full review HERE. Trust me, it’s worth it.}

I don’t know about you, but bundt cakes aren’t a staple in my home. I do have a pretty cobalt blue bundt pan—purchased once upon a time to make some chocolate rum cake, I believe—but I only break it out every few years. Plus every time I hear the word “bundt” I think of My Big Fat Greek Wedding. (You remember, the scene where fiance Ian’s (John Corbett) WASPy parents bring a buntd cake to the very Greek parent’s massive party and the Greek mom puts a flower arrangement in the center of the cake…)

I am also NOT a good baker. Why I chose a from-scratch cake recipe to try (opposed to my normal Betty-in-a-Box route) I don’t know. Wait—I do know—LIMONCELLO.

I figured, even if the cake turned out nasty, I could drown it in limoncello and no one would care. But the cake was NOT nasty. It was actually pretty good. Now, lemon cakes don’t pack the oomph of a decadent death-by-chocolate masterpiece. But they’re steady, solid, and if you’re a lemon fan like me, almost a comfort food. This cake was dense and moist. Since it is my first vegan cake (and my first scratch cake in a while) I’m not sure if that was me or the recipe. This had a density more like a donut.

But donuts are GOOD, so we didn’t care. In fact, we had an overabundance of desserts in the house, so we ate much of this baby for Sunday breakfast. (It’s okay. I paired it with yogurt and fruit. And it’s vegan anyway, so that’s all like health food, right? Well, minus the liquor…)

Pin It


LIMONCELLO BUNDT CAKE
from Betty Goes Vegan: Over 500 Classic Recipes for the Modern Family
by Annie & Dan Shannon
 Makes one bundt cake

CAKE

Baking spray
1 1/2 cups sugar
1/2 cup margarine, softened
1 tablespoon applesauce
1 tablespoon Ener-G egg replacer, just the powder,  not made per the instructions on the package
2 1/2 cups all-purpose flour
1 teaspoon baking soda
1 teaspoon crushed pink Himalayan salt
1 (14 oz.) can coconut milk
2 tablespoons lemon zest
3 tablespoons limoncello

GLAZE

1/2 cup margarine, softened
2 cups powdered sugar
2 tablespoons lemon zest
1/4 cuplimoncello (best homemade recipe HERE)

Preheat the oven to 325 degrees. Spray a fluted tube cake pan with baking spray.

In a large bowl, blend your sugar and margarine with a handheld electric mixer on a high setting until it is smooth and fluffy. Blend in the applesauce and egg replacer.

In another bowl, whisk together the flour, baking soda, and salt until completely blended. Add the flour mixture to the margarine mixture a little at a time, alternating with the coconut milk. Each time you add flour or coconut milk, use your mixer to blend i tin completely. Once your flour and coconut milk are completely blended in, add your lemon zest and limoncello and blend on a medium setting for 2 to 3 minutes. You want your after to be fluffy and smooth.

Pour your batter into the pan evenly. Use a spatula to spread it out to make a nice even layer. It’s important to make sure the batter is even because the cake will be sitting with the rimmed ring on top. If you see any ridges or clumps, make sure to smooth them out now.

Bake for 45 to 50 minutes. Now, not every fluted cake pan is the same, and some are deeper than others. So start checking on your cake at around 330 minutes. Use a bamboo skewer to test if your cake is done. If you can poke the bamboo skewer in a few times and remove it cleanly, you’re done. Once you’ve pulled the cake out of the oven, immediately poke it several more times—like 15 times—with the bamboo skewer. You only want to go in about as deep as a fork would go. You’re releasing the moisture from the cake to help it cool and also to help release it from the pan. Let your cake cool for 20 minutes and then turn your cake pan upside down on a large serving dish to cool to room temp.

While your cake is baking, make your glaze. In a saucepan, melt your margarine over low heat. Once your margarine is melted, use a whisk to blend in your powdered sugar. Then blend in the lemon zest and limoncello. The glaze is pretty sweet. If you taste it an you are, like, “This is too sweet,” just add a little more melted margarine and lemon zest until you get the flavor you like. You’re going to want to keep your glaze warm till you drizzle it over the top of the cake.

Once your cake is cool, drizzle your glaze over the top. In the springtime, it’s really nice to decorate those lemon cakes with edible flowers and completely worth hunting them down.

Photobucket

Full Book Review HERE


Betty Goes Vegan: Over 500 Classic Recipes  for the Modern Family
Annie & Dan Shannon
Grand Central Life & Style
$26.99 (hardcover), $10.67 (Kindle) 480 pages

Easy Sweet & Sour Veggies & Meatballs with Minute Rice

We all have our go-to meals—ones whipped up from pantry and freezer staples that can come together in 30 minutes or less. This recipe has become one of my families favorites. It’s inexpensive, simple, and (relatively) healthy.

A few years ago I was searching for a recipe to use up a fresh pineapple before it went bad. I’d never tried sweet & sour meatballs—beef and pineapple? My family looked at me as if I was crazy, but they trusted my cooking and gave it a try. Everyone loved it! I altered that original recipe a bit each time I made it, balancing the sweet and savory to my tastes and adding tons more veggies. (In my house, the easiest way to get everyone to eat more veggies is to mix everything together.) The fruits and vegetables are more the stars of this dish, while the meatballs are the accompaniment. Dish this over a bed of rice, and you have a tasty, healthy meal.

I’ve always been a fan of one-pot meals, and this one totally fits that bill. By using Minute-Ready-to-Serve Rice, you don’t even need to wash a rice pot. It doesn’t get much easier.

*Note: recipe listed uses frozen/pantry staples. It’s almost as easy with fresh veggies & fruits.

 Easy Sweet & Sour Veggies & Meatballs

serves 4
total time 25 minutes 

1 20 oz. can of pineapple chunks (juice reserved)
3/4 cup water
3 tablespoons white vinegar
2 tablespoons soy sauce
1/2 cup packed brown sugar
1/2 teaspoon ground ginger (or fresh if you have it)
3 tablespoons cornstarch
1 (14- oz) bag pepper stir fry (slice green, red, & yellow bell peppers & white onions)
1 12-oz. bag fresh chopped broccoli florets (or a bag of frozen will do)
1 pound precooked frozen meatballs
ground pepper to taste
non-stick cooking spray

2 packages Minute Ready-to-Serve Rice (2 servings each) *I like the Jasmine variety with this dish

  • Defrost precooked frozen meatballs as per your microwave’s settings.
  • Coat large pot or wok with non-stick spray. Cook pepper blend and broccoli until thawed and tender, about 10 minutes. Add thawed meatballs.
  • Meanwhile, mix the reserved pineapple juice with enough water to make about one cup. In a large bowl or measuring cup, combine juice mix, 1/3 cup water, brown sugar, vinegar, and soy sauce. Whisk in ginger and cornstarch. Stir until smooth. Pour into pot or wok with veggies and meatballs. Stir until mixed.
  • Simmer gently for about ten minutes.
  • Heat Minute Ready to Serve Rice as per directions (about one minute).
  • Serve Sweet & Sour Veggies & Meatballs over a bed of fragrant rice.


**Another easy option: toss it all in a crock pot. Reduce water by half, cook on low for 3-4 hours. Serve over rice. Done.

Minute® Ready to Serve Rice is an ideal portable solution for lunch or breakfast because you can eat it on the go, straight from the cup. In just 60 seconds, you have fully cooked rice for any meal or snack. You’ll never get bored with your lunch since there are 10 flavorful and wholesome varieties. If you’re looking for a healthy option, Minute® Ready to Serve Rice provides easy portion control since it’s conveniently packaged in two individual single-serve cups.
Visit www.love-every-minute.com for recipes, including Minute® Ready to Serve Stir it Up recipe ideas and more information about the Minute® Rice family of products.

This is a sponsored post written by me on behalf of Minute® Ready to Serve Rice.

Rich. Decadent. Hunky. The World’s Best Brownies

{I’m airing a rerun of one of my favorite (and most popular) recipes. These babies are the perfect way to spoil you valentine—or yourself.}

Rich. Decadent. Dark. Hunky. Sweet. Luscious. And easy *wink wink*

Sounds like the perfect Valentine, right? But it is far better than a man. It’s silent, scrumptious, doesn’t care what you look like and satisfies you anytime, anywhere. It’s one of my favorite comfort foods from childhood: my Mom’s Magic Camping Brownies.

Okay, so that title doesn’t quite give them the justice they deserve, so I shall explain.  Growing up we didn’t have much junk food in our house—Oreos were not an after school snack nor did Fruit Loops ever grace our breakfast table (except on my birthday). But we always had dessert. Never a Ho Ho or a Twinkie, but a freshly baked portion of utter deliciousness.

Mom usually reserved these treats for special occasions or baked them upon request for parties, school events, and the regular group camping trips. Forgetting the beer or even breakfast would have been forgivable, but we would have been fed to the alligators if we showed up without the famous brownies.

When I went away to college Mom sent them in care packages. What else could a college freshman possibly want when she woke up Saturday “morning” at 3 p.m. than to nibble on a little piece of gooey chocolate and caramel heaven.  They were also popular at late night parties, and once, perhaps while a little intoxicated, I called them “Magic” brownies. The accidental misnomer excited the party-goers to a near frenzy to grab at the delectable morsels. They were only slightly disappointed when I insisted they were not, ah em, spiked with special herbs  But by then everyone was too busy reveling in chocolate ecstasy to really care and the name stuck.


Pin It


Mom’s “Magic” Gooey Chocolate Caramel Brownies


  • 24 kraft caramels (7 oz) unwrapped
  • 1 5 1/3 oz can (2/3 cup) evaporated milk
  • 1 package devil’s food cake mix
  • 1 cup chopped walnuts
  • 6 tbsp. melted margarine
  • 1 small bag (1 cup) chocolate chips


  • Combine all but 2 tbs. evaporated milk, cake mix, walnuts, and margarine; mix well (it will be thick).
  • Spread half the cake mixture in a well greased 13x 9x 2 inch pan.
  • Bake at 350 for 10 minutes.
  •  Meanwhile,  melt caramels and 2 tbs. evaporated milk in a small saucepan over low heat until smooth.
  • Sprinkle half the chocolate chips over the hot baked crust.  Drizzle the melted caramel on top.
  • Drop the remaining cake mixture by spoonfuls all over the caramel and carefully try to cover as evenly as possible (it will still be lumpy).
  • Sprinkle the remaining chocolate chips on top.
  • Continue baking at 350 for 20 minutes more.
  • Cut into bars while still warm (but not hot).
  • Cool in pan.
  • Enjoy.   If you don’t there is something wrong with you.


Pin It

Fifty Shades of Chicken: Book Review and Recipe {Go Get the Butter Breasts}

Fifty Shades of Chicken. Yes, it’s a real book. And in my humble opinion, far better than that poorly written smutty best seller.

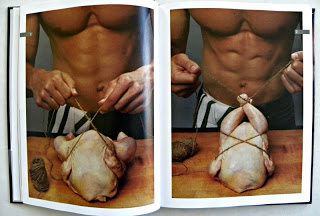
What happens when a young, free-range chicken falls under the mercy of a dominating, ravenous chef (who happens to also sport fabulous abs)? You get a delightfully quasi-erotic collection of food porn that will leave you salivating for more.

My review, both tantalizing and freaking hilarious, is up at BookshelfBombshells.com. You know you are just dying to read it.  But first, check out the dominating chef Shifty Blades’ abs trussing skills.

Whenever I review a cookbook, I select a recipe to sample. The selections in this book were almost just too scrumptious, too tempting— Dripping Thighs (roasted chicken thighs with sweet and sour onions), Cream-Slicked Chick (crisp baked chicken with honey mustard and lime), and yes, even Cock au Vin (braised chicken with red wine, mushrooms, and onions).

Tell me those titles would not make for some invigorating table conversation.

While many recipes appealed to my rather open-minded tastes, I decided if I was going to sample one of Shifty Blades’s epicurean fantasies, I was going to be bad—not just naughty, but slathered in sumptuous butter, calories, and decadence bad. I went all the way out of my (healthy eating) comfort zone with Go Get the Butter Breasts (sauteed chicken breasts with aromatic brown butter and hazelnuts). These babies just oozed desire—hot, gooey, and utterly sinful. I had to make them early, pounding the breasts into submission, gently spicing them, then slathering them with creamy butter. I tried to resist the fragrant flesh while I photographed them in all their glory, but I gave into temptation. No self-control. Holy shit, they were divine. Perhaps the dish was not my best culinary performance, but it was eagerly devoured by all, and a decadent aroma lingered in the house for hours. One diner innocently announced, “Like, whoa, that had some bang in it.” If only he knew.

Go Get the Butter Breasts 
(a.k.a. sauteed chicken breasts with aromatic brown butter and hazelnuts)
serves 2 to 4
1 teaspoon coriander seeds
2 boneless, skinless (about 8 ounces each), patted dry with paper towels
1 teaspoon coarse kosher salt
¾ teaspoon finely grated orange zest (from one small orange)
¼ teaspoon freshly ground black pepper
¼ teaspoon freshly grated nutmeg
2 tablespoons unsalted butter
2 tablespoons chopped, toasted hazelnuts or almonds (toasting instructions here)

1. Using a mortar and pestle, or the flat side of a knife, crush the coriander seeds and put them into a bowl.
2. Using the side of a rolling pin, gently pound the breasts until they submit, flattening them ¼ inch thick. Put the chicken into the bowl with the coriander and add the salt, orange zest, pepper, and nutmeg and toss to coat. Let marinate in the fridge for at least and hour, or better, up to 6 hours.
3. Melt 1 ½ tablespoons of the butter in a very large skillet over medium-high heat and let it simmer until it turns golden brown and starts to smell nutty. Add the chicken in batches and cook until golden on both sides, about 3 minutes per side. Transfer the chicken to a platter and tent with foil to keep warm.
4. Melt the remaining ½ tablespoon butter in the pan and add the nuts. Let them heat up and crisp until very fragrant, 1 to 2 minutes. Serve on top of the breasts.

Devour.
You know you want to read the full book review now. You’ll laugh. You’ll cry. You’ll feel a tantalizing flutter down there which could be hunger…or something else…

And if I haven’t won you over yet: GO READ THE REVIEW. You won’t be sorry.

And watch this book trailer. (narrated by none other than Sir Patrick Stewart. I think.)

Photobucket

10 Easy Champagne Cocktails

…to thrill your guests and help you survive the holidays.

Champagne tends to be the beverage of choice for my families’ gatherings. At least for the womenfolk. But bubbly can go to one’s head awfully quick if you’re not careful, and since I’m often the one organizing the festitvites, I must keep my head so I don’t burn dinner or let my lips get too loose. Many Champagne drinks add additional liqueurs, packing the punch. Not what I needed. So, for years I’ve tested out various Champagne cocktails—mixers to cut the potency a bit and make everything tasty and festive. Below are ten of my favorites.

You can pour all into a punch bowl if you have an elegant family heirloom you’d like to show off (something I must remember to do) or mix them individually if everyone wants something different.

Generally, one bottle of Champagne (or sparkling wine or Prosecco) serves 4 to 6, depending on the size of your champagne flutes or glasses.


Tangerine Mimosa
Serves 4 to 6

1 1/8 cups freshly squeezed or frozen tangerine juice
1 750-ml bottles Champagne, chilled

Pour 3 tablespoons juice in each Champagne flute. Fill flutes with Champagne, and serve.


Cranberry Pear Bellini

 Serves 8

1 cup pear nectar
1 cup cranberry juice cocktail
1 750-ml bottle Prosecco or other dry sparkling white win, chilled

In a small pitcher or large liquid measuring cup, combine pear nectar and cranberry juice cocktail. Pour 1/4 cup juice mixture into each of eight champagne glasses. Dividing evenly, top with Prosecco or other dry sparkling white wine.


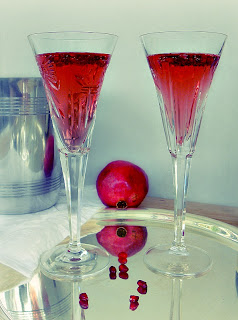
Pomegranate Cocktail
 serves 1

1 fl. oz. pomegranate juice
1/2 fl. oz. Grand Marnier
Sparkling wine as needed 

Pour juice and Grand Marnier into flute. Fill to top with sparkling wine or champagne. *(Optional) Garnish with pomegranate seeds.


Seabreeze Champagne Cocktail
 
cranberry juice
Champagne or sparkling wine, chilled, as needed
lime twist (optional)

Fill flute 1/4 with cranberry juice. Fill to top with champagne.  Garnish with lime twist.

Kir Royal
 Serves 6

3 ounces (6 tablespoons) creme de cassis
1 750-ml bottle Champagne or other sparkling white wine
6 strips tangerine or orange zest, for garnish

Just before serving, pour 1 tablespoon creme de cassis into each glass. Fill with Champagne, and garnish with zest.


Peach, Pear, or Mango Bellini
 serves 1

Peach, pear, or mango nectar (Kern’s) 
Prosecco or sparkling wine, chilled, as needed

 Fill flutes or glasses 1/4 with nectar. Fill to top with Prosecco.


Strawberry Champagne Punch

serves 12

1 750-ml bottle Champagne or sparking wine
1 2-liter ginger ale
2 boxes frozen strawberries

Mix all in punch bowl and ladle into glasses.


Or if you do want to go stronger:


Lemoncello Fizz
serves2

1 cup Champagne or sparkling wine
1/4 cup limoncello liqueur
Crushed ice
(optional) fresh raspberries or frozen raspberries, thawed

In a small pitcher, combine the Champagne and limoncello. Place a spoonful of crushed ice into each of 2 Champagne glasses and top with raspberries. Pour the Champagne mixture over the ice and raspberries. 

Cheers!
Gingersnap balls, no bake cookies, holiday food gifts

Holiday Recipes: Lemon Ginger Truffles


The holidays are the best time of year to revel in family traditions, and to make some new ones. I like to switch things around a bit, put my own twist on the classics, add some local flavors to my holiday recipes.

Tradition: My family’s Rum Ball recipe has been passed down for generations (once we hit legal age) and I love making them each year. (It doesn’t hurt that they are by far the easiest cookie/treat recipe in my mom’s repertoire.)

Semi-tradition: After we moved into our home over a decade ago (OMG) we found a way to use up the bounty of citrus in our yard. If our lemon trees have a good year, hubby and I brew a big vat of Limoncello as soon as our lemons turn bright yellow. Some years we mix it up and make Tangerinecello. Some years we go crazy and make both. Our friends and family especially love us those years. (Check out the easy recipes here and here.)

New tradition: I love all things ginger. Hmmm…lets switch up the rum ball recipe…maybe gingersnaps instead of vanilla wafers…some Limoncello instead of rum…it’s worth a try.

One taste, and these babies were declared a grand slam winner.


Pin It


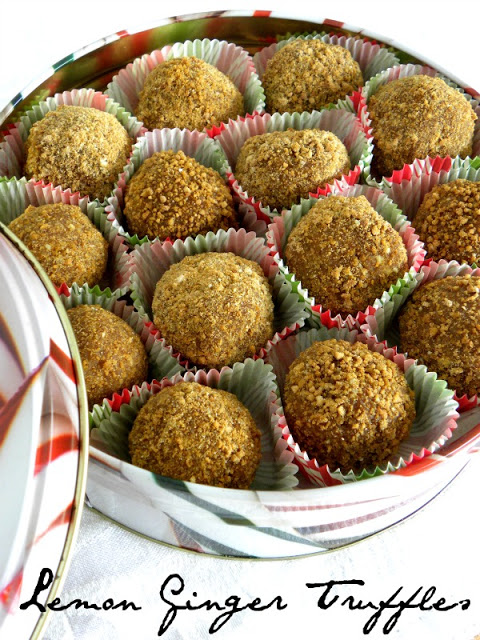
Lemon Ginger{Snap} Truffle Balls


Time: roughly 30 minutes
Yield: about 3 dozen


1 cup crushed ginger snaps (the hard ones)*
1 cup crushed vanilla wafers*
1 cup crushed pecans*
1 cup confectioners sugar
2 tbsp. honey (or white corn syrup)
1/3 cup Limoncello (available at most liquor stores or recipe HERE)
optional: 1/2 tsp. lemon zest
extra ginger snap crumbs, sugar, or chopped pecans for coating/dusting

*I recommend crushing cookies and pecans in a food processor. 20 seconds and done.

  • Mix dry ingredients. Add wet and mix until combined.
  • Add desired dusting materials to a shallow dish. 
  • Scoop out about a tablespoon of mixture (use a cookie scoop for speed and consistent size) and roll into balls. (This is easier if you keep your hands damp.)
  • Roll each ball in the dusting sugar or crumbs to coat evenly.
  • Set each ball onto a wax paper covered cookie sheet and chill in refrigerator.

Keep refrigerated. Since they don’t contain any cream, they can stay at room temperature {while you bestow them upon your appreciative friends & family} but if you want them to last for weeks, keep them in the fridge. They’re better to eat chilled, too. And the longer they sit, the tastier they will be.

Place each ball in a mini cupcake wrapper for an impressive display.

Do you have a favorite holiday recipe? You can submit your favorite holiday recipes to the Winn-Dixie Recipes to Impress E-cookbook for a chance to be featured in the final e-cookbook. Need some recipe ideas?  Browse through the submitted recipes in the gallery to see how others are celebrating local flavor.

You can also join Winn-Dixie for a Twitter party on December 18, 9 p.m., EST. RSVP here http://twtvite.com/WDLocalHoliday


Thank you to Winn-Dixie for being a sponsor. I was selected for this opportunity by the Niche Mommy Network & Conference. All opinions expressed here are my own.

Great Gifting: Homemade Limoncello

“Pure sunshine in a bottle.”

That’s my favorite description of Limoncello, the refreshing and iconic drink of the Italian Coast. Hubby and I fell in love with the lemon liquor during our honeymoon in Italy. After each dinner (and occasionally even lunch) our cameriere (waiter) would deliver the delightful chilled shot glass of brilliant yellow liquid. Whether sipped or shot, a glass of this elixir leaves you with a slight afterglow, as if you have been kissed by the sun.

Since we couldn’t stay in Italy forever (oh, how I wish we could have) we had to hunt down our new favorite after-dinner digestivo stateside.  Ten years ago, that wasn’t so easy.  Luckily, a co-worker’s Italian Mamagraced us with her family recipe. Making limoncello became Hubby’s passion, nearly an obsession, as he tried to duplicate the taste he so fondly remembered from our lazy days in Italian cafes.

Don’t worry, we shared. Limoncello became a holiday tradition. Friends and relatives threatened to withhold our gifts if we didn’t give them another years supply under the tree. Yeah, it was that good.

When we bought our home years ago, one of the first garden purchases we made was our own little lemon tree. Kept in a huge pot by the pool, our little tree produces a healthy crop each year. As soon as they are ripe and ready, it’s time to make the cello. Hubby zests and I save all the juice and freeze it for later use. A few years later, we added another tree (which finally produced fruit for the first time this year!)

I’m going to share our TOP SECRET recipe with you. This recipe makes quite a big batch — enough to last you a year (unless you have a wicked drinking problem) and to share. Make it. Put it in a cute bottle. Heck, you could put it in a plastic water bottle. Your friends will LOVE you…

Italian Limoncello

1 kilo lemons – 2.2 lbs (about 10)
1 liter grain alcohol*
1.25 liters water
700 grams (3 1/2 cups) sugar

Step 1

  • Using a zester or a fine grater, remove only the colored part of the lemon rind. Avoid the white pith just below — it is bitter and will change the flavor. (This part is messy, but your whole house will smell like a citrus grove.)
  • Pour the grain alcohol into a large glass jug or jar (must have a lid to seal). Add the zested rind. Let it sit for four days to two weeks at room temperature. (Yes, it must be glass. Large mason jars or recycled gallon sized wine bottles work well. The citric acids will corrode plastic.)

Step 2 (four days to two weeks later)

  • In a large pot, bring the water and sugar to a boil. Stir until sugar is completely dissolved. Cool.
  • Layer some cheesecloth over a mesh strainer and set over a large bowl.  Pour the grain/rind carefully into the strainer, filtering out all of the rind. Pour the (now vibrant yellow) alcohol back into the glass jar.
  • Add in cooled sugar water.
  • Store in glass or distribute into smaller, decorative bottles. Keep servings in the freezer —it is best ice cold.

*Many recipes call for vodka, but we prefer grain. Higher alcohol content = no chance of it freezing when you store it in the freezer. But if you can ‘t find grain (I’m told some states won’t sell it?) you can use vodka.

*We don’t waste the lemons after they’ve been zested. We freeze the juice in ice cube trays and save it for cooking and lemonade.

*Don’t worry about letting it sit. The longer you wait to drink it, the better it tastes. But make sure to drink it ice cold.

As I stated before, this makes a fabulous gift. You can find decorative bottle many places such as Ross, World Market, Pier 1, TJ Maxx, etc. You can also recycle glass beverage bottles for a simple and inexpensive presentation—the Sweetleaf Tea bottles are the perfect size and the caps even state “Homemade Goodness”

I’ve made many lables over the years, but this is a scan of my original Limoncello tag I’ve used for over ten years. Maybe it’s time to update, but I’ll always love it.

 front                                       back

Now, make go some Limoncello. Take two shots and email me in the morning.

If you do any more I don’t want to hear from you (and don’t blame your hangover on me).

Salute!
{that’s “cheers” in Italian, you know…}

Ham, Apple, and Brie Quesadillas

Brunch . . . I never know quite what to make. Sometimes my blood sugar levels have dropped because I’ve skipped the “official” breakfast, so I crave muffins or scones. More often I want something savory— real food— not some frou-frou dish.

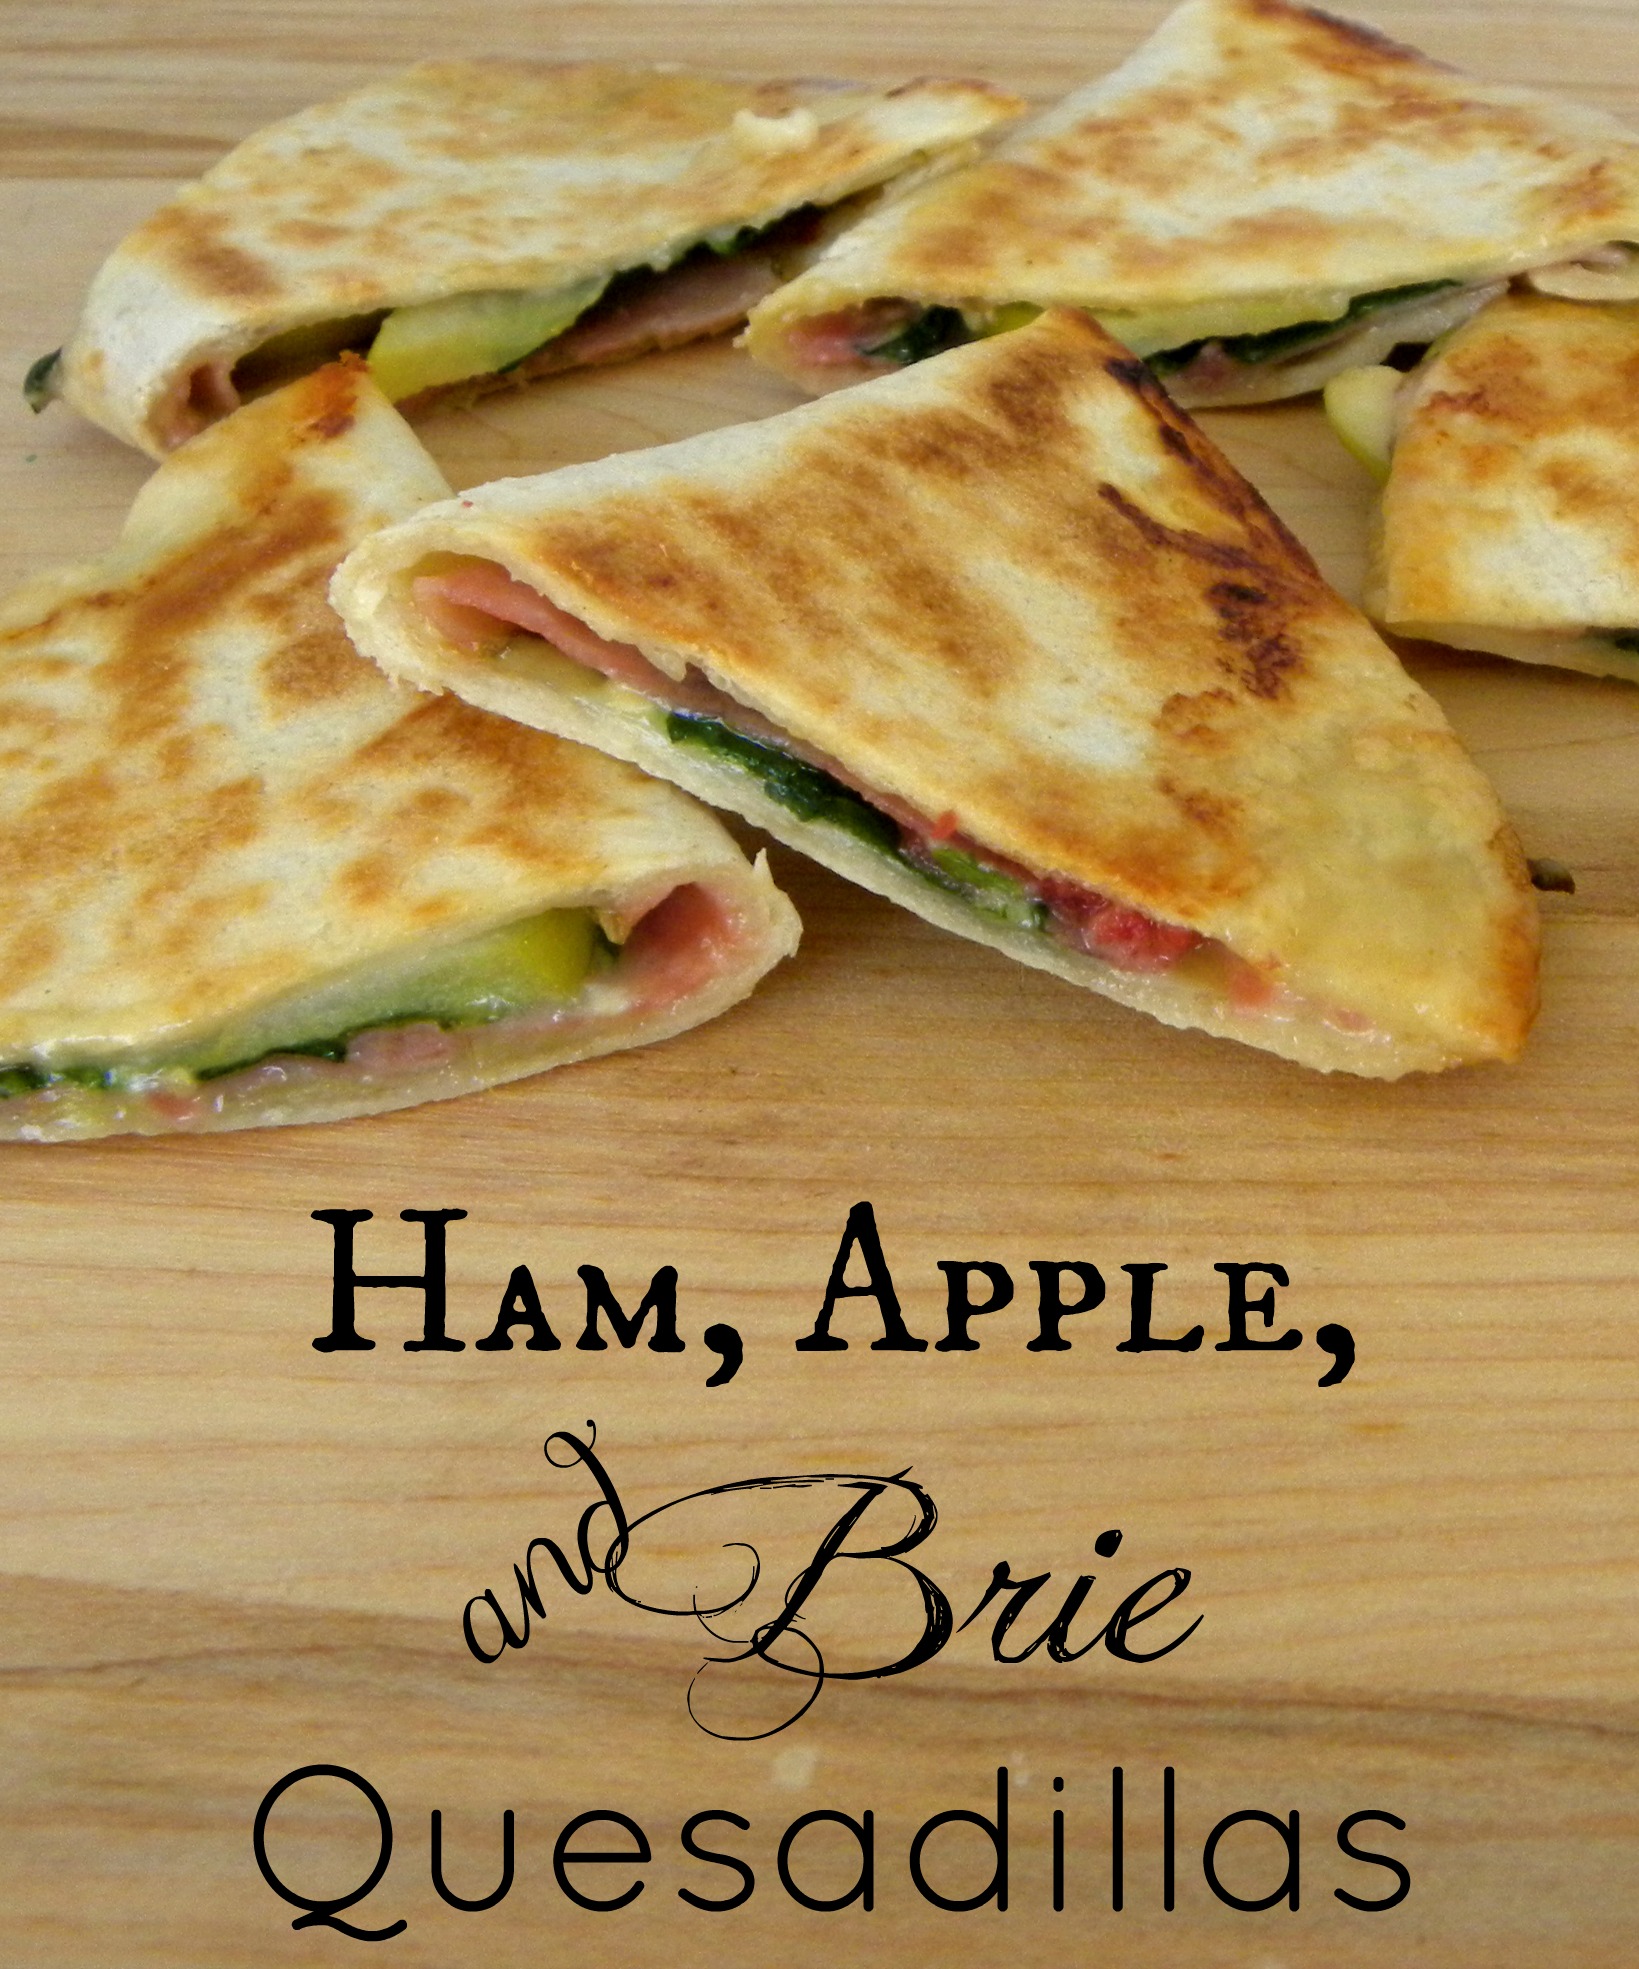
I decided to do a combination of sweet and (mostly) savory for a weekday brunch with old friends. Sweet-tart apples with savory rosemary ham melted together with some creamy brie . . . good stuff. I make this dish for an easy dinner (paired with a spinach salad) also, and it’s always a hit at this house. (Anything inside a tortilla is considered a taco by the kiddo, so he dubs this dish “fancy tacos.”) Would also make an easy appetizer. Very versatile.

Turns out my cats wanted to eat this stuff just as much as I did—not sure if it was the ham or the brie, but I had to break out the spray bottle to keep the monsters away.

ham, apple, and brie quesadillas, brunch, appetizer recipes

Pin It

Ham, Apple, and Brie Quesadillas

2 tsp. Dijon mustard
2 tsp. apricot preserves
6 flour tortillas
1 large apple (cored and cut into 1/4 inch slices)
6 slices good quality ham (I love the Rosmarino found at Costco)
6 oz. wedge of brie
a handful of fresh spinach (optional)
non-stick cooking spray

  • Mix Dijon and preserves in a small bowl. Set aside. {Save any leftovers for dipping sauce if desired.}
  •  Preheat oven to 400 degrees.
  • Cut the rind from the brie. Slice wedge into 1/4 inch slices. {Stick the wrapped wedge into the freezer for 20 minutes or so first to make slicing easier.}
  •  Cover your largest cookie sheet with aluminum foil to make clean up a breeze. Spray foil with non-stick cooking spray. Lay tortillas on cookie sheet, making sure at least half of each is on sheet.
  • Add about half a teaspoon of Dijon/apricot sauce to each tortilla—spread over half.
  • Layer a slice of ham on top.
  • Cover ham with layers of spinach, apples, then brie.
  • Fold other half on top. Bake for about 4 minutes or until bottom side browned to your liking.
  • Using a large spatula, flip each quesadilla. Bake for another 3-4 minutes.
  • Cool slighly, cut into wedges {pizza cutter works well}.
  • Enjoy!

Makes 6 main course (along with a salad) servings. More for appetizers.


Holiday Recipes: Brandied Cranberry Apple Pie and Classic Sage Stuffing

When Unilever asked me to share two of my favorite holiday recipes using I Can’t Believe It’s Not Butter, knew exactly which treats I’d dish up. One is a recipe which has been passed down for generations, my family’s Classic Sage Stuffing. Trust me, you will never want to eat that nasty stuffing from a box again. The recipe is simple, budget-friendly, and can easily be doubled or halved depending on how large your family gathering may be this year.
I wasn’t sure if I was ever going to divulge my famous Brandied Cranberry Apple Pie recipe. Sweet apples mixed with tart cranberries and a luxurious layering of rich brandy finished with a crumb topping — you will never look at a plain apple pie again. It’s that good.


Brandied Cranberry Apple Pie

Ingredients: 

1 frozen/refrigerated deep dish pie crust

Filling:

2 1/4 pounds apples peeled, cored, and thinly sliced (I prefer a mix of Granny Smith and Gala, but use any variety you prefer)
1 cup dried cranberries
2/3 cup sugar
3 tablespoons all-purpose flour
1/4 teaspoon cinnamon
1/4 teaspoon nutmeg
1/4 teaspoon clove
1 teaspoon vanilla extract
1 1/2 {generous} tablespoons brandy*

Topping:

2 tablespoons I Can’t Believe It’s Not Butter Spread, butter, or margarine
1/2 cup all-purpose flour
1/2 cup brown sugar
sprinkle of cinnamon
Directions:

  • Follow pie crust thawing instructions. Or, if you insist, make your own single pie crust.
  • Preheat oven to 375 degrees.
  • For filling: mix sugar, 3 tablespoons flour, cinnamon, nutmeg, cloves, and cranberries in a large bowl. Add in apples and toss to coat. Mix in vanilla and brandy, combining thoroughly.
  • Spoon mixture into pie crust. Gently press down with spoon to pack apples together. Mound slightly in the center.
  • For topping: in a separate bowl, combine  1/2 cup flour, brown sugar, and a pinch of cinnamon (if desired). Using a pastry cutter or two forks, cut in the 2 cold tablespoons of I Can’t Believe It’s Not Butter until the mixture resembles coarse crumbs. Spoon mixture over pie filling, covering completely up to the edge of the crust. You may gently pat down to even out the crumbs. With a knife, poke a small slit in the center of the topping so steam can escape while baking.
  • I recommend placing pie on a cookie sheet, as the filling sometimes oozes out a bit. Cover the edge of the crust with aluminum foil. Bake at 375 degrees for 25 minutes. Remove foil from crust. Bake pie 35 minutes more.
  • Cool on a wire rack.  Serve warm or at room temperature.

Topping Suggestions:  I am an à la mode  girl, and I usually top a slice of warm pie with ice cream: eggnog is my favorite, but vanilla or butter pecan blend deliciously as well. You can also top with whipped cream.

*You can omit the brandy, but I highly recommend you include it as it adds an amazingly rich layer of flavor. Don’t worry, the alcohol bakes out. You can also substitute Cognac or Bourbon.

Classic Southern Sage Stuffing

Makes 8 to 10 servings, but this recipe can easily be doubled or halved.

Ingredients:

8 cups white bread crumbs (crust on)*

1 cup I Can’t Believe It’s Not Butter spread
2 onions diced
6 stalks of celery chopped
3/4 teaspoon marjoram
3/4 teaspoon pepper
2 teaspoons salt
2 1/4 teaspoons sage
2 eggs
2/3 cup chicken broth

Instructions:

  • *To make the breadcrumbs: Use slightly stale (NOT moldy) white bread. Hamburger buns also work. If bread is very fresh, spread on a cookie sheet and bake in a slow oven (200 degrees) until slightly dry. Cool. Slice bread into roughly 1/4 inch cubes. Do not chop in a food processor as the crumbs will be too small and the stuffing will not firm up. 1 cup fresh breadcrumbs = approx. 3 slices bread. (Can be prepped days ahead.)


  • To make the stuffing: In a large skillet, melt I Can’t Believe It’s Not Butter spread. Add onions and celery. Saute until translucent, about 10 to 15 minutes.


  • In a large bowl, mix together bread crumbs and seasonings. Pour in all sauteed onions, celery, and remaining I Can’t Believe It’s Not Butter. Mix.
  • In a separate small bowl, beat the eggs then add chicken broth (make sure broth is not hot). Add to bread crumbs and veggie mix. Combine thoroughly.
  • Spoon stuffing into a greased casserole and bake (uncovered) for 35- 45 minutes at 325 degrees or until top is lightly browned. (In my family, we cook it longer and fight over the crispy edges.) Note: this stuffing is pretty flexible, and it will cook at whatever temperature your turkey or other dishes require.
  • Though I prefer baking the stuffing on its own, you can also stuff this mix into a 5 – 10 pound turkey (double for a 11 – 20 pound bird) and bake according to the directions (on bird).  Stuff the bird just before placing it in the oven and remove all the stuffing when bird is cooked.

Leftovers (on the slight chance that any remain) can be frozen.


Thank you to Good to Know & Unilever Spreads for being a sponsor. I was selected for this opportunity as a member of Clever Girls Collective. All opinions expressed here are my own.


Healthy Pumpkin Pineapple Mini Muffins

Somehow November is upon us. Between brutal storms, wicked weather, and Halloween partying (if you were lucky) October sneaked out the back door. But no worries—it’s still pumpkin season until that last slice of Thanksgiving pumpkin pie disappears.

Remember when I told you I’d find a use for that leftover cup of canned pumpkin from the Pumpkin Poke Cake with Cheesecake Pudding?  {If not LOOK HERE NOW.} 

We already had a luscious pumpkin dessert, so how about some muffins? We are mini muffin addicts around here. They’re perfect for snacking, lunch boxes, freezing, and quick breakfasts. they are so moist that you don’t need to waste time buttering them or adding any toppings. Two-bite perfection!

Pin ItHealthy PumpkinPineapple

 Snack Muffins

INGREDIENTS 

1 1/2 cups flour
1 tsp baking powder
1 tsp baking soda
1/2 tsp cinnamon
1/4tsp nutmeg
1/4tsp ground ginger
1 large egg
1/2cup packed brown sugar
1 cup pumpkin
3/4 cup pineapple (chopped or crushed, but if you use canned, drained)

INSTRUCTIONS

  1. Preheat oven to 400 degrees.
  2. Coat mini muffin tins with cooking spray.
  3. Whisk dry ingredients (flour, baking powder, baking soda, & spices) .
  4. Mix wet ingredients in a separate bowl (egg, brown sugar, pumpkin, pineapple).
  5. Mix together wet and dry ingredients until just combined.
  6. Spoon into mini muffin tins (I highly recommend using a cookie scoop) and bake 11 minutes until lightly browned.
  7. Cool on wire rack.

It just doesn’t get much easier than that.